Intermission: CY8CPROTO-062S3-4343W
I received an email from Cypress offering me a development kit. They indicated they wanted to reward their helpful Community Users. I have answered a few questions for beginners in the PSOC community. I accepted, and in about 4 weeks the kit arrived.
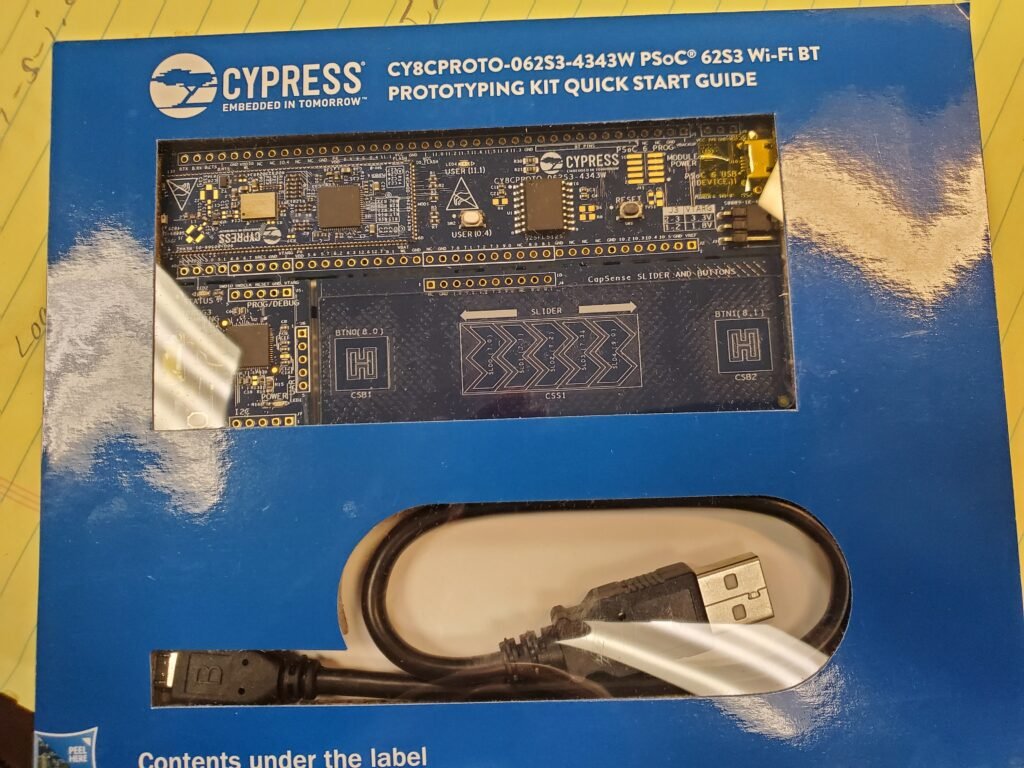
I have always liked the way Cypress bundles their prototype kits. No extra fluff, easy to see what you have, and easy to transport before opening. It is smaller than an 8 1/2 x 11 ” sheet of paper, and barely thicker than a new legal pad. Easy to slip into a laptop carry case along with the laptop.
Their kit is also aggressively priced. For only $30 from their website, you can acquire one. That is extremely inexpensive, and allows for weekend tinkering or small production runs. Quality is extremely high.
Initial Look-See
I took some photos. First is the front and back of the prototype kit sitting on a legal pad on my desk:
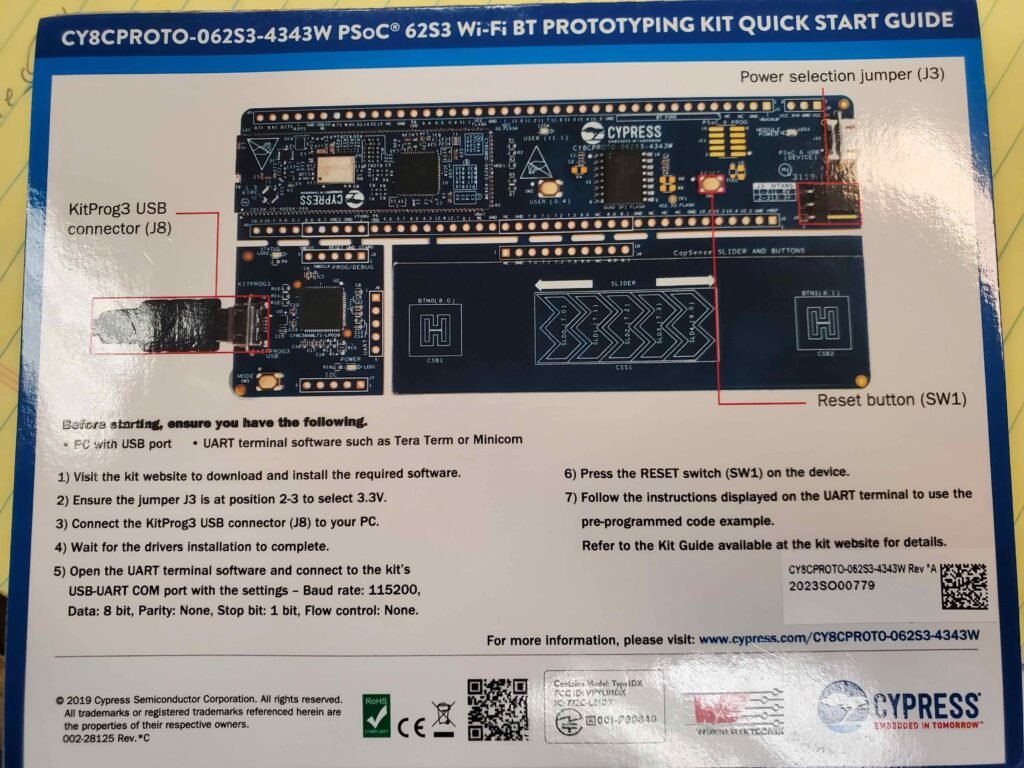
The Cypress instructions are brief, yet extremely clear. I wish others knew how to do that. The website to download information about the kit is here. Note that you will need to register with Cypress (free) to download the files (also free).
Cypress changed some things with the PSoC Creator 4.x series. You can now download kit information as needed, assuming Cypress creates a kit for it. On the page for this product you can download 7 files, including schematics, guides, and release notes. However, there does not appear to be a “Kit” for this board in late 2020, so Cypress has started down the road of not supporting PSOC Creator for its PSOC family.
Board Look-See: KitProg 3
I examined the board, and took a look around. The kit consists of 4 boards. Three boards are joined with PCB fingers. The “main” board is a carrier for the PSOC 6 and the WiFi/BlueTooth module. Take a look at the KitProg board:
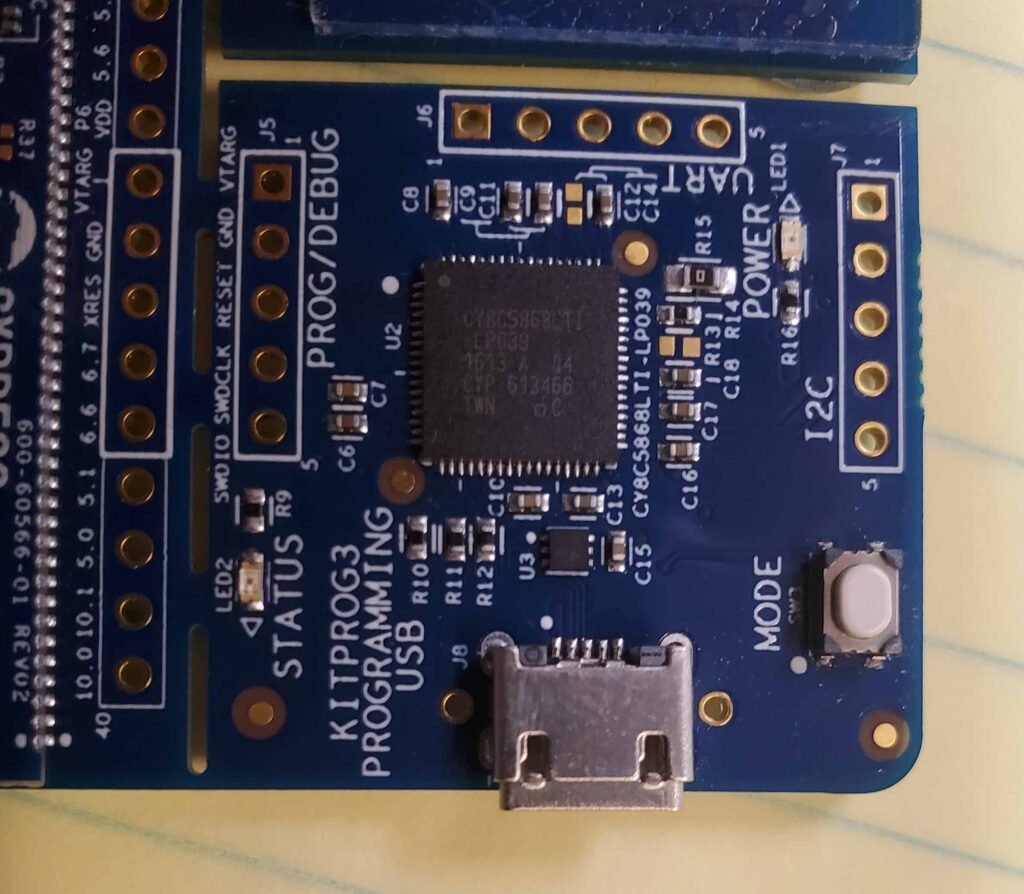
It looks like all you have to do is snap the board off, solder 0.1 inc headers to the board, and to the PSOC 6 carrier board, and you have a portable debugger and Communication Device that can do serial or I2C I/O for projects, or program and debug your PSOC 5 or 6 systems. This is ideal for the Home based Engineer/tinkerer.
The main board contains the PSOC and Blue Tooth/Wireless radio. Here is the photo of the setup:
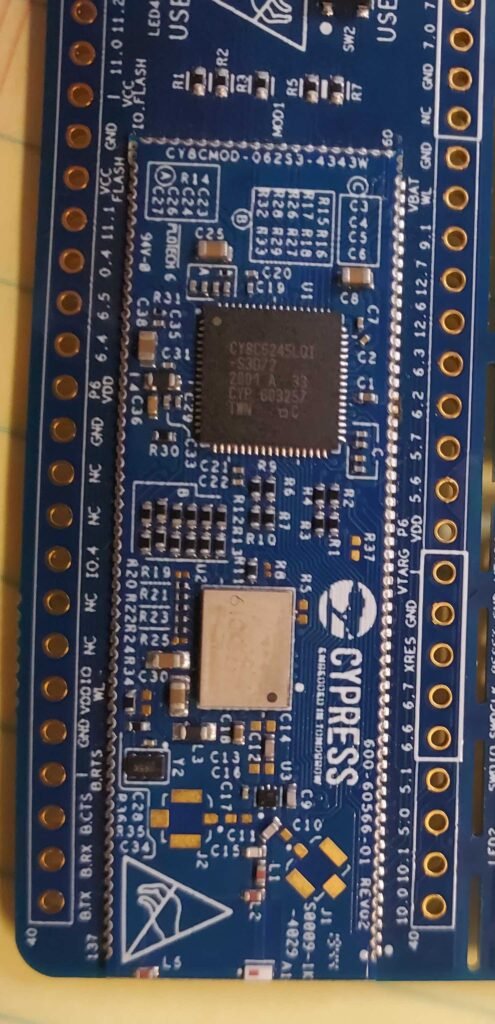
According to the Cypress website, the radio is certified, so you can experiment without issues. I quote from the website, “A certified Murata LBEE5KL1DX module based on the CYW4343W combo device (802.11b/g/n, single-band 2.4GHz + Bluetooth (BR + EDR + BLE).” Note that under the “Getting Started” tab, several links are not working. This appears to be due to Infineon reworking the cypress forums. Hopefully they will clear that up.
The radio supplied with this kit contains its own ARM processor, a Cortex M3. In addition, it has several I/O options, including UART, I2S, and GPIO. Unfortunately, it only comes in WCLSP package, so it will be very difficult for the weekend tinkerer to use the package as is. There are supposed to be Linux drivers already written for this product according to the Cypress web page, but that link is currently broken.
In theory, you can use the WICED WiFi SDK to custom program the device. I looked at the WICED development environment early on, and was overwhelmed by it, so I had to drop it. In addition, reports from my son (who is an accomplished engineer) indicate there are bugs in the TCPIP system which he was unable to solve. I will look at the current state of affairs for this product in regards to bluetooth and wifi, and when I get the “round tuit,” I will blog about it.
Quick and Dirty Radio (Fully Certified)
For me, the easiest to use radio for weekend projects is the ESP32-WROVER. If you are careful, you can connect it to a CY8CKit-059 and use the 3.3V power supply on that module to give you the voltage reference for I/O Communications to it. I used open collector drivers with pull ups to the 3.3 volts on that part and its 3.3v output signals can be read by the 5V inputs on the PSOC just fine.
As a matter of fact, that was the purpose of using 3.3v. It was designed to be readable by 5V input ports without having to do level translation. Writing from 5V to a 3.3v part can actually damage that part. However, if you use pull up resistors to 3.3v and then open-collector outputs, you can always interface a PSOC to a 3.3v part regardless of either component’s power supply voltage.
In addition the WROVER is available in very small modules with scalloped edges. So, if you need to create your own board, the design allows you to hand solder the unit, which is great for the weekend engineer.
You can get a development module from Mouser, or Amazon, with on board USB to serial, and 3.3v LDO analog voltage regulator. Try to get the manufacturer’s version with an FTDI chip; third party units use the CH340/CH341 UART device. It is a buggy UART with buggy drivers, but it is dirt cheap.
The WROVER is also fully certified for use world wide. It uses FreeRTOS as its O/S. I had a project up and a working proof of concept with about 10 hours of work after creating a new circuit board carrier for the PSOC, and using the pre-built WROVER WiFi code. It uses an AT Command Set for communications, as if talking to a modem. Marvelous.
I continued with the project and did not have to change anything due to bugs in the hardware. I did update the software via serial port. My son found a TCP timeout problem for his project and fixed it, because the code for it is open source and on GitHub.
PSOC 6 Unit Back View
The Back of the Prototype is here:
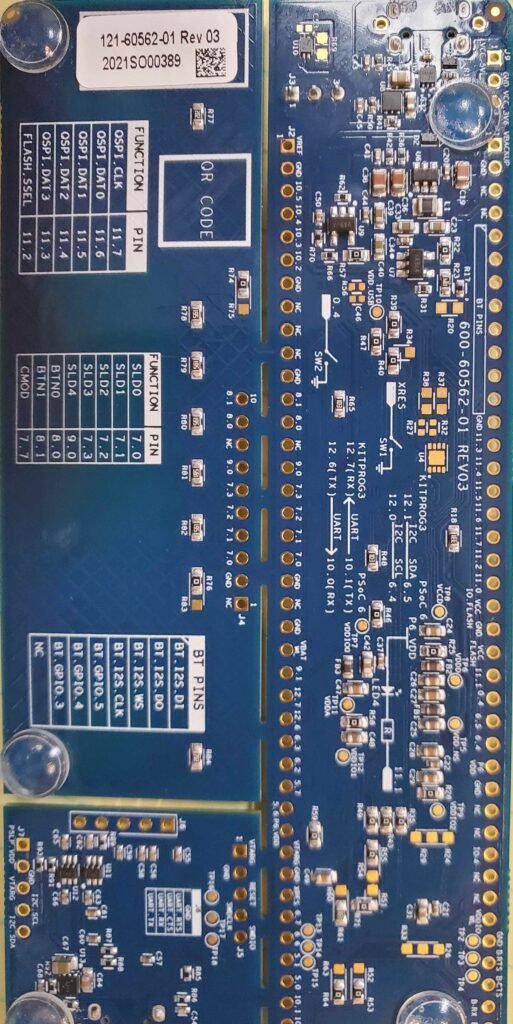
Information on the back of the prototype provides good info for hobby use. If you decide to put it onto a breadboard, you will need to capture pictures so you have some good information.
Updating the PSoC Creator
Side Note: I have used Macs for over 30 years. I have yet to have a virus. Also, using Virtual Machines allows you to keep a copy of an uninfected machine ready to go. If you get a virus and it does not easily remove, put the old VM in the trash and copy the un-infected VM over, launch it, and continue.
PSOC Creator 4.4 just came out. After a few weeks of casual observation, I have not heard of problems with it, so I am installing it on a VM now. I have to clean up the VM snapshots (which allow me to back up to a pre-install condition) in order to expand the hard drive to give it 40 gigabytes more space. Instructions for expanding hard drive space under VMWare and Windows 7 are here, and here.
Once done, I installed the 4.4 version of Creator, and start working with it. Fortunately, the project files have not changed enough from version 4.2 to cause it to modify them. That is a win in my book. In addition, the latest version of programmer recognized my KitProg 3 under Windows 7. That was broken in the 4.3 release, but appears to be fixed now. Excellent!
Unfortunately, the merger with Infineon is rearing its head again. The links from posts in messages to other messages in the forums no longer work. This may or may not be resolved in the future. I came across this while trying to locate a “kit” for the prototype board sent to me. There is no “kit” for this prototype board.
The downloaded document only mentions the Modus Toolbox as a supported development environment. This is probably why there are no PSOC Creator “kits” available for it.
Even though there are no “kits” for that board, the PSOC Creator can handle the product. You just have to “lie” to PSOC Creator a little in order to create an example that can be loaded. After the example compiles, start modifying the project to make it your own.
PSOC Creator VS Modus Toolbox: Knockdown!
As a matter of fact, if you wish to use the UDB inside the device, then PSOC Creator is the goto choice. When the team that Cypress picked to develop Modus Toolbox was employed, they decided not to include the visual schematic drawing platform. This is almost a knockout blow in my opinion!
Unfortunately, with Modus Toolbox, adding in components is extremely difficult. Interconnecting these components without going through pins is extremely difficult, if not impossible. Adding AND, OR, NOR, NOT gates is a puzzle for me. Fortunately, PSOC Creator makes those things dead simple.
It also appears that the ability to arbitrarily assign pins is difficult in Modus Toolbox. Many screens are involved. Unfortunately, it appears that Cypress has lost the Creator design team and the ease of use design strategies they brought to the table.
My completely ignored requests (with ‘I’ll look into it’ replies that suddenly get dropped with no comment), lead me to the opinion they are under contract with that schematic design tool. Therefore I believe they are unable to port it to any other development environment. This would be a great opportunity for the open source community. If you are interested, contact me.
I went ahead and downloaded the files and started reading. There is a lot to this product. Unfortunately, the latest version of Modus Toolbox refuses to install on my Macintosh. I am currently running Sierra, and the 2.0+ version of Modus Toolbox demands High Sierra, for absolutely no reason I can discern, before it will install. (Yes, there are valid technical and business reasons I am on Sierra. However, I may indeed have to convince the management I need to upgrade.) I will look into fooling the install program.
To help the use of this board with PSOC Creator, you can download the 62 BLE Pioneer kit from here. The Kit Only files zipped should work. That will load one example project into PSOC Creator database. This “kit” appears to set up some things up for Creator (especially 4.2), which will be useful in the future.
New Approach For Example Projects: GitHub
Infineon has taken the approach of putting the files onto GitHub for your use. To access files for this board, go to GitHub here. I downloaded the “Hello World” program using the results of the search. The search result segment is shown here:
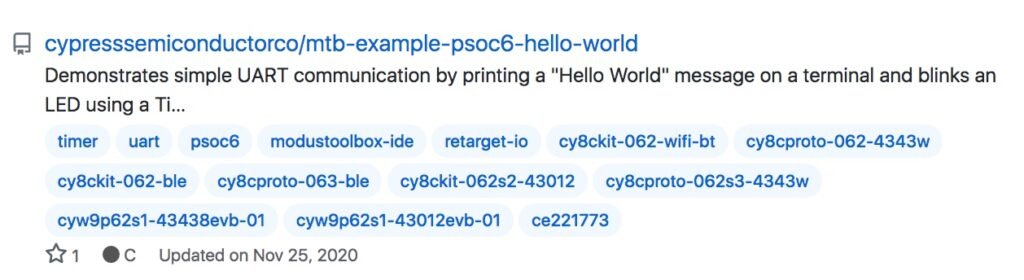
The link for the project is at the top of the search result. The products the project apply to are listed below. The cy8cproto-062s3-4343w in blue lets us know this project will work for our board. When clicked through, the readme indicated you can download an earlier version of this project for use with Modus Toolbox earlier than version 2.2.
PSOC Creator Not Supported on GitHub For This Prototype board
Unfortunately, no project is given for PSOC Creator on GitHub for this prototype board. That means that you must either 1) install Modus Toolbox (based on the horrible eclipse IDE) without the ability to create a schematic for your product, or 2) use your brains and leftover projects from the PSOC62 pioneer kit version.
Mr. Hawes with Cypress indicated at the launch of Modus Toolbox in his introductory video that Modus Toolbox will be the only platform supporting the PSOC MCU’s in the future. That was explicitly denied in the forums at the time, but with the current code setup on GitHub, his statement is coming true. Ugh.
Modus Toolbox 2.0 on Macintosh
I was able to force install of Modus Toolbox 2.0 on Macintosh Sierra, mainly by moving files by hand. Once that was set up, I chose File->New->Modus Toolbox IDE Application from the menu. (The Github instructions are slightly wrong, the “IDE” is left out of their description of the menu selection. Not that you are not actually creating an IDE application, you are creating an IDE project.)
In that list, I was able to find the prototype board, and a very long list of available projects is there:
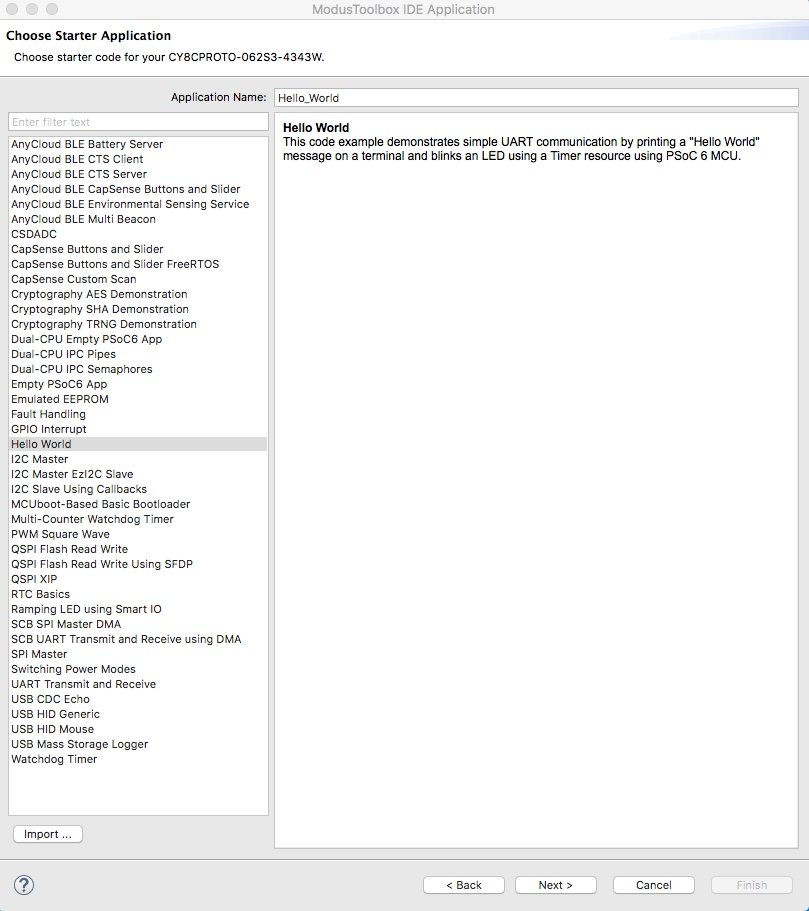
I chose the Hello World project. Note that I am not doing this to use the project on Modus Toolbox. I am doing this in order to see what components I need to put into the PSOC Creator project. I also hope to be able to determine how the components were configured.
The load of the project generated an error message. So, in order to use Modus Toolbox 2.0 to build the project on my Mac, I chose to go into the /Applications folder and created a soft link from the Modus Toolbox 2.0 installation to the ModusToolbox directory. (Note that Mac is built on a version of the BSD Unix system, and is POSIX certified.)
I opened a terminal window and entered the command as follows. You may need to be an administrator or use sudo to do this in the applications folder:
mac: user$ ln -s ModusToolbox_2.0/ ModusToolbox
mac: user$ ls -l Mod*
lrwxr-xr-x  1 user  admin  17 Jan  7 09:29 ModusToolbox -> ModusToolbox_2.0/
After that, I was able to do a build on the project, and got the following results. Note that I am removing a lot of the intermediate information in the successful build. It is quite wordy:
09:30:01 **** Build of configuration Debug for project Hello_World ****
/Applications/ModusToolbox_2.0/tools_2.0/modus-shell/bin/make CY_MAKE_IDE=eclipse CY_IDE_TOOLS_DIR=/Applications/ModusToolbox_2.0/tools_2.0 -j7 all
Tools Directory: /Applications/ModusToolbox/tools_2.0
CY8CPROTO-062S3-4343W.mk: ./libs/TARGET_CY8CPROTO-062S3-4343W/CY8CPROTO-062S3-4343W.mk

Prebuild operations complete
Commencing build operations...

Tools Directory: /Applications/ModusToolbox/tools_2.0
CY8CPROTO-062S3-4343W.mk: ./libs/TARGET_CY8CPROTO-062S3-4343W/CY8CPROTO-062S3-4343W.mk

Initializing build: mtb-example-psoc6-hello-world Debug CY8CPROTO-062S3-4343W GCC_ARM

Auto-discovery in progress...

-> Found 190 .c file(s)
-> Found 50 .S file(s)
-> Found 26 .s file(s)
-> Found 0 .cpp file(s)
-> Found 0 .o file(s)
-> Found 6 .a file(s)
-> Found 466 .h file(s)
-> Found 0 .hpp file(s)dd
-> Found 0 resource file(s)

Compiling libs/psoc6hal/COMPONENT_PSOC6HAL/source/cyhal_lptimer.c -DCY_USING_HAL -DCY_APPNAME_mtb_example_psoc6_hello_world -DCY8C6245LQI_S3D72 -DCY_TARGET_DEVICE=CY8C6245LQI_S3D72 -DTARGET_CY8CPROTO_062S3_4343W -DCY_TARGET_BOARD=CY8CPROTO_062S3_4343W -DCOMPONENT_4343W -DCOMPONENT_BSP_DESIGN_MODUS -DCOMPONENT_CM0P_SLEEP -DCOMPONENT_CM4 -DCOMPONENT_PSOC6HAL -DCOMPONENT_SOFTFP -DDEBUG  -I. -I./libs -I./libs/TARGET_CY8CPROTO-062S3-4343W -I./libs/TARGET_CY8CPROTO-062S3-4343W/COMPONENT_BSP_DESIGN_MODUS -I./libs/TARGET_CY8CPROTO-062S3-4343W/COMPONENT_BSP_DESIGN_MODUS/GeneratedSource -I./libs/capsense -I./libs/core-lib -I./libs/core-lib/include -I./libs/psoc6hal -I./libs/psoc6hal/COMPONENT_PSOC6HAL -I./libs/psoc6hal/COMPONENT_PSOC6HAL/include -I./libs/psoc6hal/COMPONENT_PSOC6HAL/include/pin_packages -I./libs/psoc6hal/COMPONENT_PSOC6HAL/include/triggers -I./libs/psoc6hal/include -I./libs/psoc6pdl -I./libs/psoc6pdl/cmsis -I./libs/psoc6pdl/cmsis/include -I./libs/psoc6pdl/devices -I./libs/psoc6pdl/devices/include -I./libs/psoc6pdl/devices/include/ip -I./libs/psoc6pdl/drivers -I./libs/psoc6pdl/drivers/include -I./libs/retarget-io

..... and so forth and so on.......

    Linking output file mtb-example-psoc6-hello-world.elf
==============================================================
= Build complete =
==============================================================

Calculating memory consumption: CY8C6245LQI-S3D72 GCC_ARM -Og

   ----------------------------------------------------
  | Section Name         |  Address      |  Size       |
   ----------------------------------------------------
  | .cy_m0p_image        |  0x10000000   |  5996       |
  | .text                |  0x10002000   |  41380      |
  | .ARM.exidx           |  0x1000c1a4   |  8          |
  | .copy.table          |  0x1000c1ac   |  24         |
  | .zero.table          |  0x1000c1c4   |  8          |
  | .data                |  0x080022f8   |  1704       |
  | .cy_sharedmem        |  0x080029a0   |  8          |
  | .noinit              |  0x080029a8   |  148        |
  | .bss                 |  0x08002a3c   |  852        |
  | .heap                |  0x08002d90   |  244336     |
   ----------------------------------------------------

  Total Internal Flash (Available)          524288
  Total Internal Flash (Utilized)           51332

  Total Internal SRAM (Available)           260096
  Total Internal SRAM (Utilized with heap)  247048


09:30:15 Build Finished. 0 errors, 0 warnings. (took 13s.763ms)
Once that was done, I started looking around. In order to see the “configuration” that the project is using, you have to click on a link in the “Quick Panel” as shown here. The link to click on is “Device Configurator (new configuration):

This brings up the “Configuration” viewer. Looking at this, it shows that the project configures the cap-sense, but nothing else. Not sure why, but the board is there. There may be a reason for it (don’t want to blow up input ports by leaving them un-configured?) Hmm.
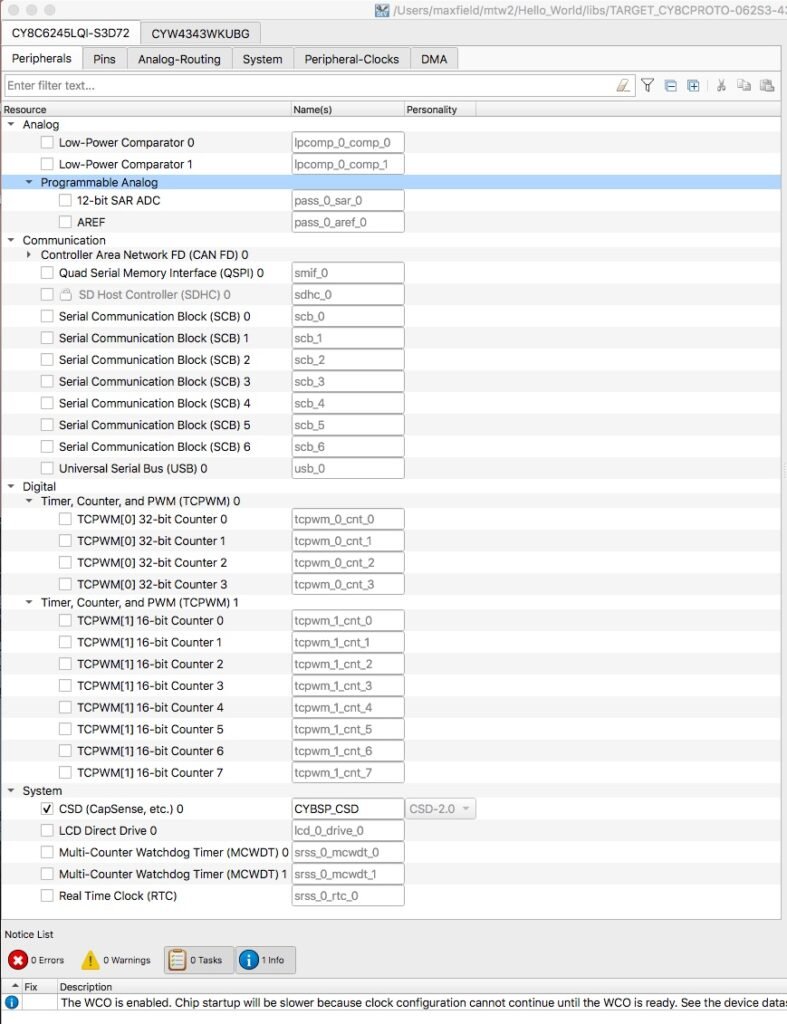
On the pin configuration side, the SWDIO and SWCLK pins are configured to their default locations. The Modus Toolbox requires you to set up *everything* yourself, although it probably fills in certain defaults.
If you make a really bad mistake, you might end up with an unrecoverable board. This is where the PSOC Creator shines. (I have *never* turned board into a brick by programming a Creator projects. Sometimes the project failed, but the board worked.) Here is the configuration screen:
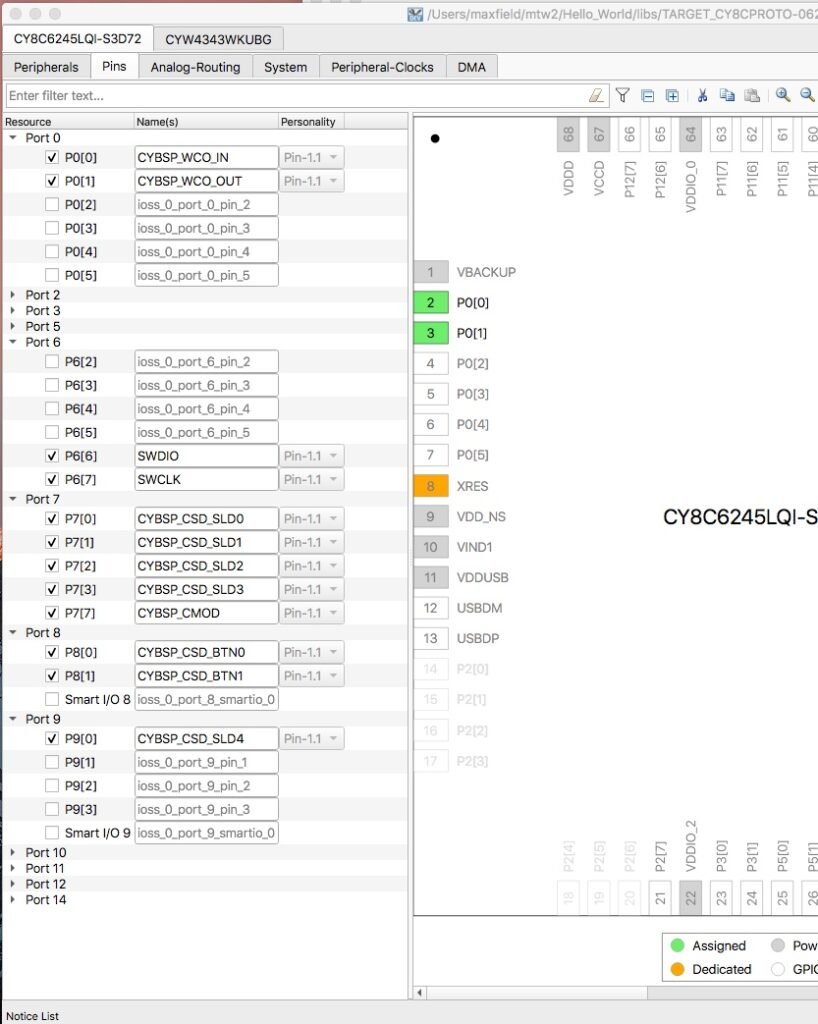
The Analog-Routing screen shows you your routing choices for your selected analog components. The System screen describes the clocks in a fashion that can be related to by a user of Creator. The other screens were more or less empty.
So, there appears to be *no* hardware GUI configurations in this project, except for the possibly mandatory CapSense. Hmm. I am not liking this. Of course, Cypress projects have always been a bit light in showing what I wanted to see. That is why their forums were mandatory for the engineer.
Turning to the Code
Looking in the code for this project, the push away from visual designing is apparent. Everything is done through HAL (Hardware Abstraction Layer) code. HAL is one of the software engineer flavors du jour. Having been in software engineering for real time software since the 1970’s, I have seen these things come and go in waves as graduates from our “Universities” take their teaching into the real world.
Unfortunately, the real world does not care about college ideals. It wants things to work as quickly and efficiently as possible. Almost all of the teaching in the colleges today ignore the fact that you have limits in processor technology.
The limit is always either available power, available memory, cpu speed (available clock cycles), input-output capability, lack of hardware, or a combination thereof. All of these limits work together to eventually force people back into the same patterns: drop your idealism and make it work. The area Real Time Software Engineers stumble on the most is making every CPU cycle count.
In almost every case where CPU resources are limited, making it work forces the engineer to drop things like HAL and write to the “bare metal” of the System (or SOC) he is working with. Ugly, but how many projects change CPU families during production runs?
In addition, HAL almost never translates between CPU families. So, Atmel HAL is different from PSOC HAL in many marvelous little ways. So the goal of saving work often vanishes. (Never say *always,* just say *often.*) This too shall pass.
Now, to contradict myself. Using the Schematic Entry Method in the PSOC Creator creates calls to the libraries for each of the components when compiled. This “HAL” is fairly lightweight, and so is fairly close to writing to the bare metal.
Sometimes it was too much. So, in the past, I have read the code and stripped it down (or modified it). I then called my code instead of the library code. This was easily done because I always had the source code right there to look at in the PSOC Creator project itself.
PSOC “Hello World” Example decoded
A timer is set up by HAL and is magically used with no reference to the hardware resource used referenced to or shown in the GUI interface. This, of course, can lead to problems when combining code.
On the other hand, the borrowing user can include code snippets that need no hardware schematic configuration. So the casual user of your code could *usually* assume it will work with no additional work on their side.
In practice that sometimes fails. This HAL approach is driven by people jealous of the marvelous PSOC Creator IDE, in my opinion. A side note: you can also do this in PSOC Creator either by borrowing the configuration code from the GUI generated code or by using the PDL (HAL) libraries that are now part of PSOC Creator.
So, for our work, we will start with a project in Creator for the PSOC62 and wrestle it to the ground. The goal will be to blink a light on the board. I will cover that in a future post, if I continue to survive.
Next Time?
Hopefully next time we will have a blinking led using PSOC Creator and this board.
Enjoy!
About The Author
W Maxfield
Firmware/hardware Engineer for too many years.
Hello,
did you ever get this devel board to work with PSoC Creator 4.4?
The issues I’ve found are the lack of a device selector for the correct PSoC CY8C6245LQI-S3D72 (vaguely solved using a similar 68 pin package), but underlying that, the inability to flash the board where KitProg finds an ARM device but does not have the required driver widget for it.
james@JAMESFREEMA54AC MINGW64 /c/Program Files (x86)/Cypress
If you look at what data represents the logical entity of a PSoC6 device there is a header file (about 1200 lines long that defines it). This is included in cy_device_headers.h and also gets mentioned in the PDLx.x.x.x.msi installer binary. I have not yet decompiled that to see if it’s doing anything more than copying files.
$ grep -r ‘cy8c624alqi’.
PDL/3.1.3/devices/psoc6/include/cy8c624alqi_d42.h:* \file cy8c624alqi_d42.h
PDL/3.1.3/devices/psoc6/include/cy_device_headers.h: #include “cy8c624alqi_d42.h”
Binary file PDL/3.1.3/updates/PDL3.1.3.19.msi matches
PDL/3.1.5/devices/psoc6/include/cy8c624alqi_d42.h:* \file cy8c624alqi_d42.h
PDL/3.1.5/devices/psoc6/include/cy_device_headers.h: #include “cy8c624alqi_d42.h”
Binary file PDL/3.1.5/updates/PDL3.1.5.9.msi matches
Hi Dr. Freeman,
I never got the CY8C6245 to work with PSOC Creator 4.4. As far as I can tell, Infineon has only updated Modus Toolbox to work with it.
I strongly suspect the incompatibility is due to supporting Secure Boot. There are some handstands the debuggers have to do to communicate with two processors, one being a secure boot processor.