Infrared Sending Part 2
Parts
In the previous post, I gave you the internals of the PSOC to create the IR transmitter. I experimented with several IR LED’s and eventually settled on some LED’s from Vishay. Their TSAL6xxx series is a good through hole part, available at Mouser.
The external transistor can be an N channel Mosfet (Metal Oxide Semiconductor, Field Effect Transistor) such as the 2n7000, available from Amazon (follow the link) or Mouser. You can also get a NPN darlington, such as a BC517 in a kit from Amazon, also available at Mouser.
To wire up the IR, the following circuit is used for the FET:
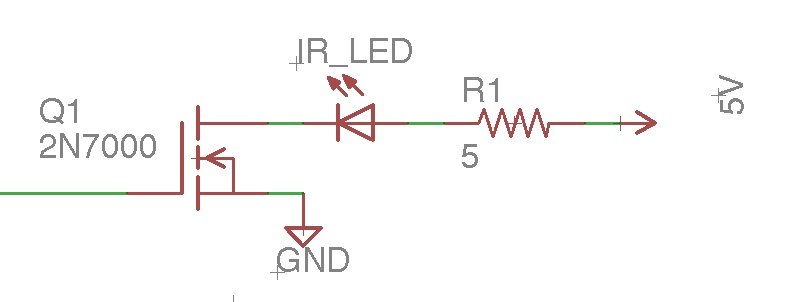
The gate of the FET goes into the PSOC. The output pin is configured as a resistive pull up output. If you wire up a Darlington, the schematic is essentially the same configuration. That configuration was shown in the previous post, Infrared Sending Part 1. The Q1/Q2 pair is the schematic representation of the darlington transistor. The “base” is attached to the PSOC output pin, the “emitter” is ground, and the “collector” goes to the LED Cathode. A 5 ohm resistor to 5 volts limits the current during the transmission phase.
Software
To “Play” the IR command, an extra line is added to main.c in the for(;;) loop. The handle_playIR(); routine looks for work to do and starts the interrupt driven process of playing the IR command requested:
/* ========================================
 * Copyright Wade Maxfield, 2020
 * All Rights Reserved
 * LICENSED SOFTWARE.
 *  Under the GPL v3 license
 * This license does not override previous licenses
 * Some information may be Proprietary to
 * Cypress (http://www.cypress.com) for their
 * PSoC 5LP®--Cypress Semiconductor and
 * only usable on their devices.
 * PROPERTY OF Wade Maxfield.
 * Commercial license available
 * ========================================
*/
#include "main.h"

int16_t TemperatureReadingAvailable;
float temperature;
int main(void)
{
    // the following two variables are for USBSerial/Command Parser
    int16 bufNum;
    USBSerialMessage *USBRxPtr;

    init_milliseconds();
    init_leds();

    CyGlobalIntEnable; /* Enable global interrupts. */

    initUSBSerial();// setup the USB serial interface.
    init_parse();
    init_capture();// set up the I/R Capture hardware


    for(;;)
    {

        BlinkLed1(100); // blink 10 times per second (every 100ms)

        //======================
        // usb serial port
        //======================
        if ((bufNum=handleUSBSerial())>=0){
            USBRxPtr=&USBRxBuffer[bufNum];
           parse((char*)(USBRxPtr->msg),(uint16*)&(USBRxPtr->size)); // handle possible command
        }

        temperature=getTemperatureF(&TemperatureReadingAvailable);
        if (TemperatureReadingAvailable) {
             // write your code here to do something
        }

        //===========================
        // if the user has chosen to
        // read the I/R controller.
        //===========================
        handle_capture();


        handle_playIR(); // handles scheduling of ir commands


    }
In order to play the IR command from a user interface, the parseCommands.c file must be added to. Insert the following routine into the parseCommands.c:
int16 handlePlayIR() {

    // play
    printMessage("For Equipment: ");
    if (!CurrentEquipmentID)
       printMessage("Fridgidaire\n\r");
    else
        printMessage("GE" "\n\r");

    printMessage("Playing IR sequence ");
    switch (commandBuffer[1]){
        case 'u':case'U':
            captureType=upType;
            printMessage("of UP button.\n\r");
        break;
        case 'd':case'D':
            captureType=downType;
            printMessage("of DOWN button.\n\r");
        break;
        case 'P':case'p':
            captureType=powerType;
            printMessage("of POWER button.\n\r");
        break;

        case 'h':case 'H':
            if (CurrentEquipmentID==GE_ID){
                printMessage("Command Not Available for GE\n\r");
                //goto printSignon;
                return 1;
            }
            captureType=heatType;
            printMessage("of HEAT select button.\n\r");
        break;

        case 'm': case 'M':
            if (CurrentEquipmentID==FRIDGIDAIRE_ID){
                printMessage("MODE Command Not Available for Frigidaire\n\r");
                //goto printSignon;
                return 1;
            }
            captureType=modeType;
            printMessage("of MODE select button.\n\r");
        break;


        case 'c':case 'C':
            if (CurrentEquipmentID==GE_ID){
                printMessage("Command Not Available for GE\n\r");
               // goto printSignon;
                return 1;
            }
            captureType=coolType;
            printMessage("of COOL select button.\n\r");
        break;

        default:
            printMessage("\n\rCommand not understood\n\r");
           // goto printSignon;
            return 1;
    }

    playIRSignal(captureType,CurrentEquipmentID);
    return 1;
}
In the function parse() in parseCommands.c, in the “switch(commandBuffer[0])” { section of code, add the following case statements:
         case 'p': case 'P':
             if (handlePlayIR())
                 goto printSignon;

         break;

         case 's': case 'S':{
             // select equip
             if (commandBuffer[1]=='1'){
                 CurrentEquipmentID = GE_ID;
                 printMessage("GE chosen\n\r");
             } else {
                 CurrentEquipmentID = FRIDGIDAIRE_ID;
                 printMessage("Fridgidaire chosen\n\r");
             }
             goto printSignon;

         }break;
Under the “case ‘v’:” selection in parse, where the available commands are printed, add the following printMessage() statements:
printMessage(" P[]    -- Play IR []==U,D,P,H,C (up, down, power, heat, cool)\n\r");
printMessage(" S[]    -- Select equipment 0=FR,1=GE, default 0\n\r");
This will give you some options over the serial USB uart that has been created. Once you hook up the FET or Darlington with an LED and a resistor, you should be able to play an A/C on/off command to the unit by pointing the LED to the panel and selecting the command line code.
Don’t forget to add the include for playIR.h in your main.h file:
#ifndef _MAIN_H_
    #define _MAIN_H_
/* ========================================
 * Copyright Wade Maxfield, 2020
 * All Rights Reserved
 * LICENSED SOFTWARE.
 *  Under the GPL v3 license
 * This license does not override previous licenses
 * Some information may be Proprietary to
 * Cypress (http://www.cypress.com) for their
 * PSoC 5LP®--Cypress Semiconductor and
 * only usable on their devices.
 * PROPERTY OF Wade Maxfield.
 * Commercial license available
 * ========================================
*/
#include <project.h>
#include <stdio.h>
#include "parseCommands.h"
#include "USBSerial.h"
#include "ds18b20.h"
#include "Milliseconds.h"
#include "Leds.h"
#include "captureIR.h"
#include "playIR.h"

#endif
Now add the playIR.c file (if not already added) . Go back to the previous post in this series to get the code.
Change Milliseconds.c to add the playIRFlag. I also added some time flags for future use:
volatile uint32 milliseconds;
volatile uint16 ms,seconds, minutes, hours;
volatile int16 MsLedCounter;
int16 timeFlag1,timeFlag2,playIRFlag;//<---added playIR

CY_ISR(MillisecondInterrupt) {
    milliseconds++;
    MsLedCounter++;
    timeFlag1=timeFlag2=playIRFlag=1; // set the millisecond flags


    if (++ms>=1000){
        ms=0;
        if (++seconds>=60){
            seconds=0;
            if (++minutes >=60) {
                minutes=0;
                if (++hours>=24){
                    hours=0;
                }
            }
        }
    }

}
Add the playIRFlag to Milliseconds.h:
    // the following counter can be used to start things on 1 millisecond boundaries
extern volatile uint16 ms,seconds, minutes, hours;
extern volatile uint32 milliseconds;
extern volatile int16 MsLedCounter;
extern int16 playIRFlag; //<--- added for playir.c

void init_milliseconds();

#endif
Next Time
If all goes well, next time we will look at the temperature control algorithm. At that point you have a functional A/C controller without a GUI (Graphics User Interface), sitting on a breadboard.
I created an Eagle Circuit board for this project as a test bed. I will share that with you after the temperature control is done, plus how to order boards for yourself from OSHPark.
One of my goals for this project is to have a hand buildable project. You can use a soldering iron and put everything together at your workbench, no special tools needed. This fits with the maker mentality, use commercially available parts to make something unique. (That is also why the project is based around the CY8CKIT-059).
We will get into the user interface design and implementation after the circuit board. For my GUI (Graphics User Interface), I used the Nextion series of displays, available on Amazon or from the website BangGood.com.
Enjoy!
About The Author
W Maxfield
Firmware/hardware Engineer for too many years.