Graphic User Interface Part 1
In order to make our project useful, we need a user interface that is not tied to a terminal window. That is because we eventually want to place this unit on a flat surface, or hang on a wall, and interact with it as a complete unit. Therefore we need the ability to control it without connecting to a computer.
Fortunately, a new class of intelligent displays has come about. These HMI (Human Machine Interface) displays run a program and communicate using a serial port with a processor on a System On a Chip (SOC) or similar device. The display I currently enjoy using the most is the Nextion Display.
For this project, I chose the Nextion 3.2 inch “enhanced” display. It is available from Amazon here. I chose the enhanced version because of the faster CPU, more Flash (for program), and Real Time Clock (RTC) that is button battery powered. You can obtain it for less than $40 as of July 2020.
Nextion Development Environment
The Nextion display has an IDE that is Windows only. The website for the Nextion display is https://nextion.tech. Their IDE is available at https://nextion.tech/nextion-editor/. You should get the latest version, although they do have an LTS (Long Term Support) version for older boards and projects.
Spend time using the IDE and programming a display. In the next few posts the design and implementation of the GUI (Graphical User Interface) will be covered, along with communicating with the PSOC. This part of the project will be challenging for many of you, but the rewards are many.
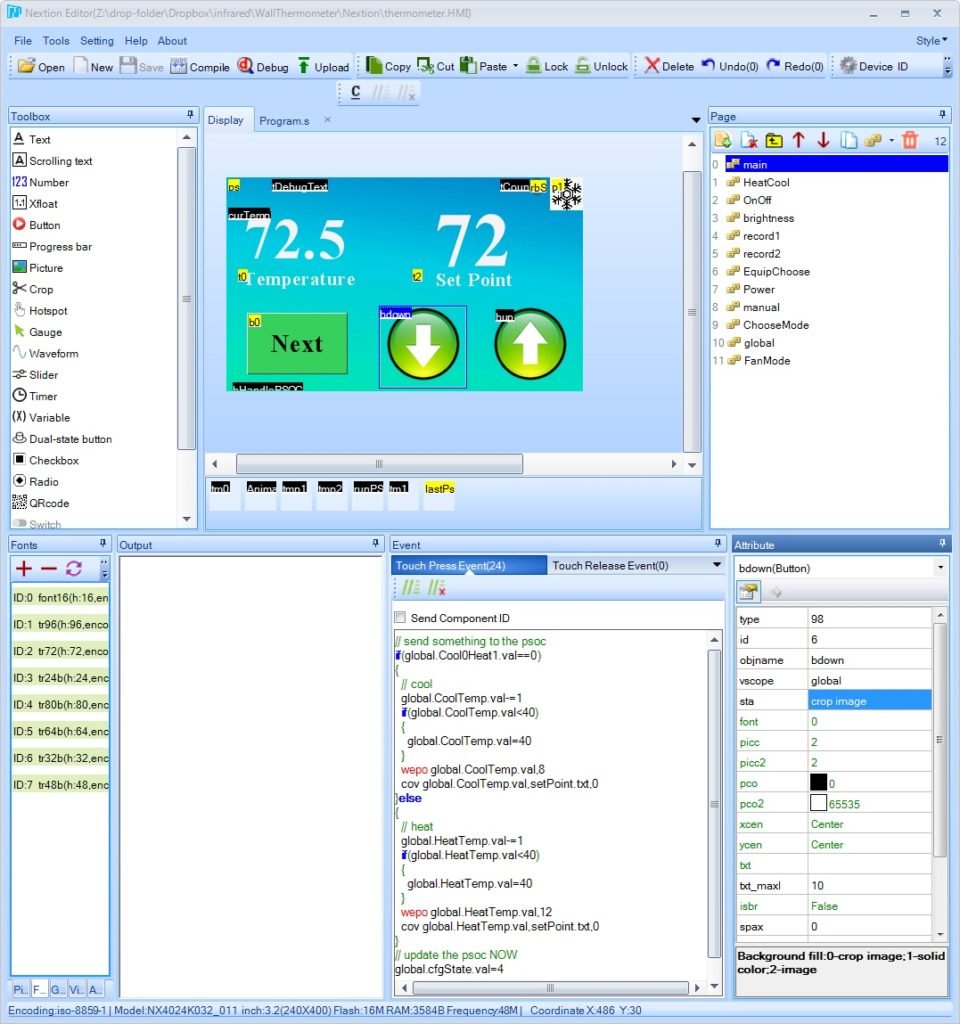
The Main Screen
In the Nextion IDE paradigm, you have Pages. Each page is a screen. You add text, images, buttons, check boxes, gauges, etc., on this screen. You also add variables. Each item has a vscope. This “scope” is either local or global.
A global scope means the item is accessible from another page. You are free to give names to the pages, and access the pages by those names, and items on those pages by using the name, a period, and then the item name.
I wanted several variables to be always active, and accessible from any page. So, I created a page named “global” and put several variables on it. Then I made sure that the user could never navigate to that page. This provided a “safe” spot for variables used on more than one screen, or used by the PSOC during communications with the Nextion display over its serial port.
I used port 12[6] and 12[7] to talk to the Nextion display from the PSOC. I chose these pins because they are bridged to the PSOC USB debugger, allowing me to snoop on the traffic to the Nextion display, or to use the IDE in simulation mode to communicate with the PSOC and test my Nextion code. Once I was finished, I broke the debugger tab off, severing the connection to pins 12[6] and 12[7], but shortening the board for placement into the box.
Here is a screen shot of the project for the Temperature Control project:

In order to create the GUI, I played around with the Nextion editor and started experimenting. The background is from a public domain image I found on the internet, with editing.
I found several public domain jpegs and pngs online (Google is your friend). I created a shading png for the background image.
Then I used a free (Google is your friend) png editor to place the images for the hdown and hup on the background image, and then placed the buttons over the background image at those locations.
To make the button appear to be a circular down arrow, select “crop image” and chose the same image that is used for the background image. As you move the button on the screen, it uses the pixel offsets of the button to “show” the image underneath that section. That bit of magic took some time and experimentation to understand.
See the following screenshot for the final effect. The text, the Next button, and the image p1 are NOT part of the background image:
I have uploaded the thermometer.hmi project at this link: https://socmaker.com/?attachment_id=542. It is zipped, so you will have to unzip it to use it.
I strongly recommend you do your own images and buttons to personalize your project. If you use the same names, you can simply replace the images and fonts in the project with your own.
This project is released under GPL3, with a commercial license available. Unfortunately, with the Nextion IDE, the project source is not printable in ASCII, so you can’t get a listing of the entire program.
Troubleshooting
As I was testing this project with the PSOC, I used the ability of the IDE to connect to the serial port the PSOC KitProg showed up on. That allowed me to do several iterations without having to attach and detach the Nextion Display for reprogramming.
Programming the Display – Get a Serial Adaptor
The Nextion display is programmed from the IDE over a TTL serial port (or directly to a micro-sd card which is plugged into the unit). In order to communicate with the display, I used a USB to Serial adapter available at Amazon here, for less than $10. You may need to purchase a USB cable to go with it. This adapter is selectable for 3.3v or 5v. (The PSOC uses 5V for our project.)
When you purchase serial adapters, units containing FTDI chips are a choice that is always good. Their drivers are extremely good, and I’ve never had a problem with them. The USB to serial adaptor I chose allowed me to plug the individual connectors to the post on the end of the card during programming, and then to the right connections on the PSOC circuit board.
Next Time
Next time I hope to add the PSOC side of the project that talks to the Nextion and go over the communication aspects of dealing with the Nextion. It requires some “sideways” thinking, as communicating with the program on the Nextion is a series of events that are separated by some distance in time. It requires a special way of thinking.
After that, I will walk through some of the programming decisions made for the Nextion and its pages.
Following that, the expectation is to use Sketchup at https://www.sketchup.com to create a wall box for holding the board and display. The box will be printed on a 3d printer.
Sketchup is free for personal use. To use for professional purposes, you have to purchase a license. If you wish to do this, hurry, because at the end of the fiscal year for the corporation producing Sketchup they are going to an annual license fee.
Enjoy!
About The Author
W Maxfield
Firmware/hardware Engineer for too many years.