PSOC5LP and QT-Creator (Bare Metal)
If you have read the previous two posts, you know that Rolf Nooteboom of OneThinx has posted how to debug the PSOC5LP on Mac/Linux/Windows, only using PSOC Creator for the Warp Verilog design and compile cycle through the GUI schematic.
I followed that and was able to get the system to work. Once I did that, I knew that my ultimate goal of using it with QT Creator was only one step away. Just as PSOC Creator’s schematic design and build system is much more intuitive than the other systems out there (including, in my opinion, Modus Toolbox), so is QT Creator’s editing system.
Unfortunately, QT Creator setup is not always intuitive, and you are left to discover your own way down the road in many cases. They have done an excellent job in the entire framework, and in their creator, but it has been a stepwise refinement from the beginning. There is nothing wrong with that, it just can lead to much head scratching until they get it working (and even afterwards, in some cases).
Regardless, I found that the whole thing was just soooooooo close, that I could taste it. Well, after a few hours of work, I finally got a compile/debug cycle working under QT Creator, and it ends up being much simpler than I thought, after too much pain and misunderstandings.
Before First Step
Go to the previous two posts and get VSCode working with your project. Once you have that done, you know the environment will work, and it will only take a few (hah!) steps to get QT Creator working. I think it is worth it, if for nothing more than understanding more of what QT can do.
Trust me, I’m from the government. I’m here to help (myself to more of what you have)!
First Step
The first step was almost my last step during the proces, as I fumbled around. I only had a small clue as to what to do. I stumbled into it by reading parts of about 20 or 30 posts and setups.
You need to install Ninja.
Not just any Ninja will do.
If you use the latest CMake, you need the latest Ninja. Get the Ninja binary from here: https://github.com/ninja-build/ninja/releases.
IMPORTANT: Place the ninja binary in a location that is in your PATH. There are ways to tell CMake where to find ninja and run it, but those ways work differently between versions of CMake, and can fail from time to time. The solution that provides the least amount of head banging against the wall is to put the Ninja Executable in a directory in your path.
Second Step
Download qt creator if you don’t already have it. I have tested this on qtcreator 4.11 and 6.0.1. I like 6.0.1 a little better because it has dark mode.
Dark mode helps me read through my cataracts without having to ignore haloing and fuzzing. I know there is something called surgery, but COVID has caused all that to be difficult to navigate in a sane fashion. I also have heart anomalies, and Physician Advice is to stay away from any possible triggers in the form of emergency approved medicines, or even catching the disease. Once Omicron is through, I suspect sanity will be (slightly) easier to find.
Third Step
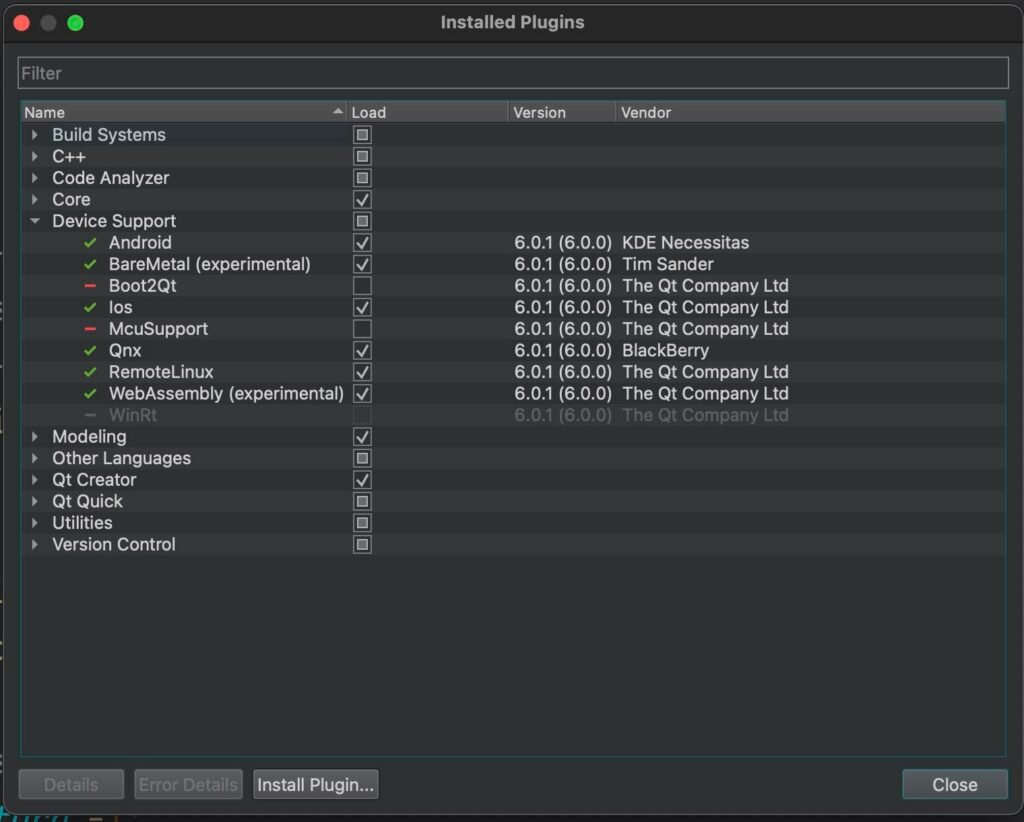
First step in Creator, you need to add the “Bare Metal” plugin. On the Macintosh, it is under QT Creator menu -> About Plugins… In Windows/Linux it is in a different spot. Go to the link below to read about it.
Navigate to the “Device Support” and check “BareMetal (experimental). It should work for you after you click “Restart Now”. For more information, see https://doc.qt.io/qtcreator/creator-developing-baremetal.html
Fourth Step
On the Macintosh, look to the dialog opened under the menu QT Creator -> Preferences. In the dialog, choose “Devices.” Navigate to the “Bare Metal” tab. If OpenOCD is listed there, click on it. Otherwise click on the Add Dropdown and choose OpenOCD.
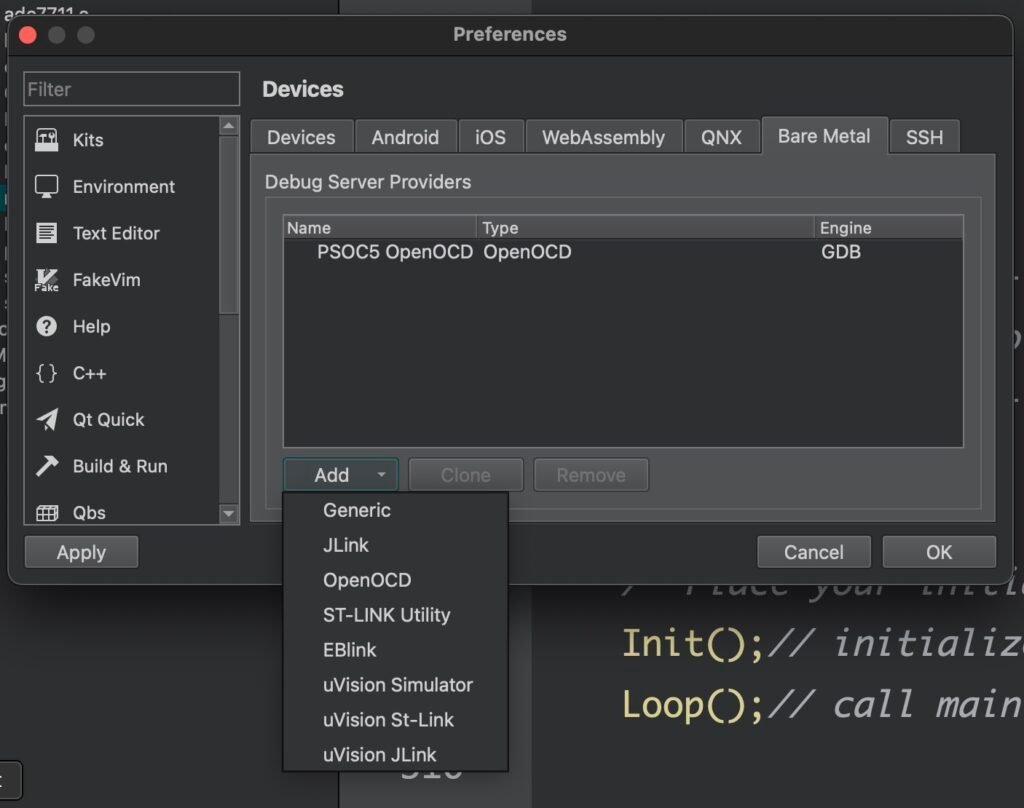
I already have it configured, which is why it show up in the list. Here is a shot of adding a new “OpenOCD” to the one I already have. I am showing you this so you can understand when you have selected it right:

This part got rather tricky. It took a while to get it set up right, and to work. Set up all the fields as you see in the image: (You should be able to enlarge the image by right clicking on it and selecting “Open Image in New Tab” if you have Firefox ).
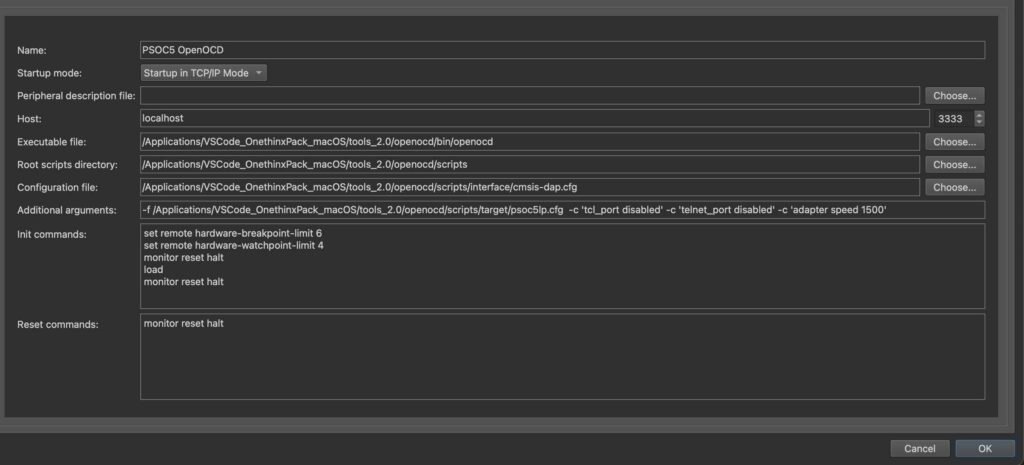
Here is what to put in the fields:
- Name: PSOC5 OpenOCD
- Startup Mode: Choose Startup in TCP/IP Mode
- Host: localhost, 3333
- Executable file: /Applications/VSCode_OnethinxPack_macOS/tools_2.0/openocd/bin/openocd (I used choose and navigated to where I had put the Macintosh version of the tools and selected)
- Root scripts Directory: /Applications/VSCode_OnethinxPack_macOS/tools_2.0/openocd/scripts (see above)
- Configuration file: /Applications/VSCode_OnethinxPack_macOS/tools_2.0/openocd/scripts/interface/cmsis-dap.cfg ( This was confusing to me. If you choose the target/psoc5lp.cfg here, it will not work)
- Additional Arguments: -f /Applications/VSCode_OnethinxPack_macOS/tools_2.0/openocd/scripts/target/psoc5lp.cfg -c ‘tcl_port disabled’ -c ‘telnet_port disabled’ -c ‘adapter speed 1500’
- Accept everything else defaulted.
- Click OK.
This sets up the “hardware” debugger, which in our case is the KitProg3 in the cmsis-dap mode.
Fifth Step
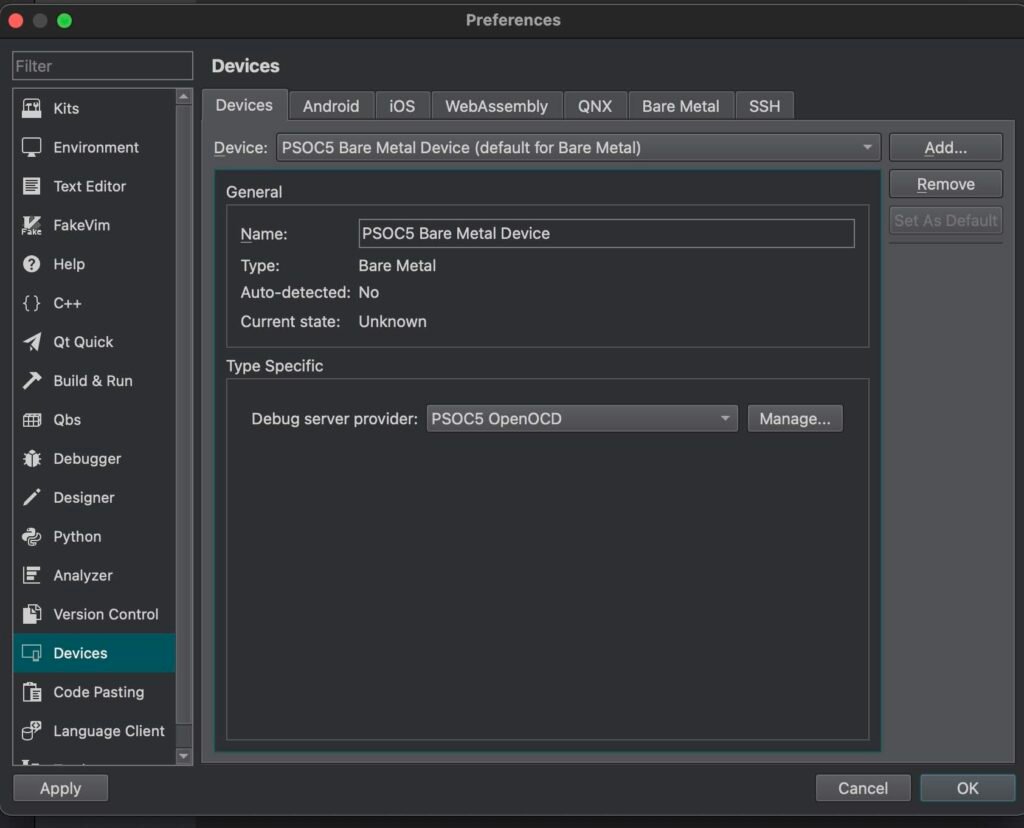
Click on the “Devices” tab. Click Add, and for Name: PSOC5 Bare Metal Device. I set the Debug server provider: PSOC5 OpenOCD.
Sixth Step
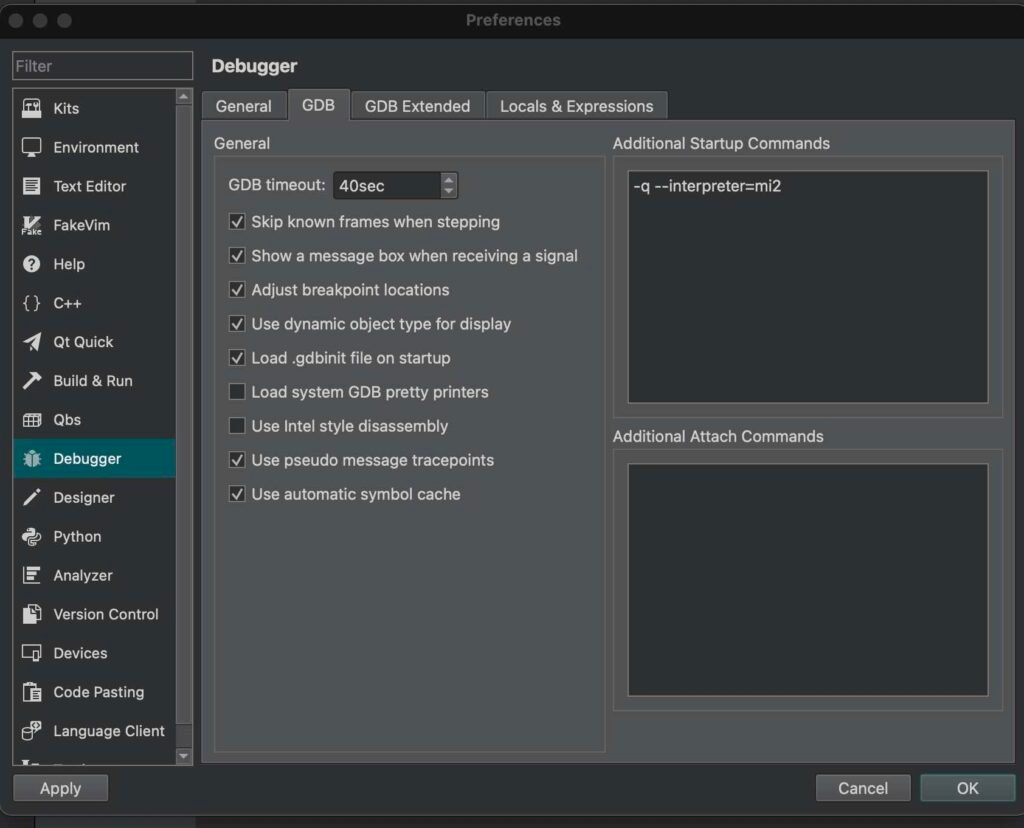
In the Preference Dialog, click on Debugger. Click on the “GDB” tab, and set the GDB timeout: to 40sec.
Click in Additional Startup Commands, and enter “-q –interpreter-mi2″
Seventh Step
Part 1:
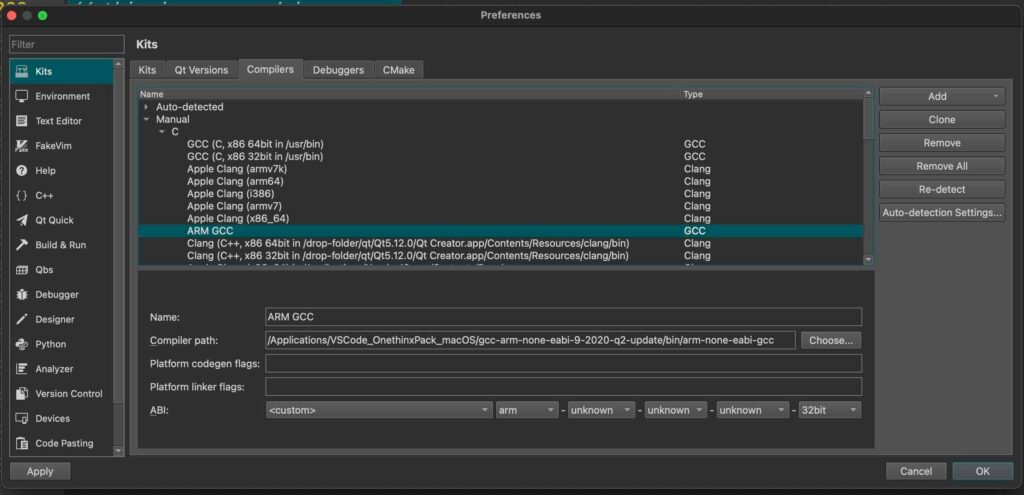
Click on Kits in the left side panel, Click on the Compilers Tab, then click on the Add Button. Set the Name: to be ARM GCC (or whatever you want), under Compiler Path: click the Choose Button and navigate to the arm-none-eabi-gcc that is installed with the OneThinx package. Leave the ABI to custom, arm, unknown, unknown, unknown, 32bit. Then Click Apply Button. You should see this:
Part 2:
Do the same for the C++, except choose g++:
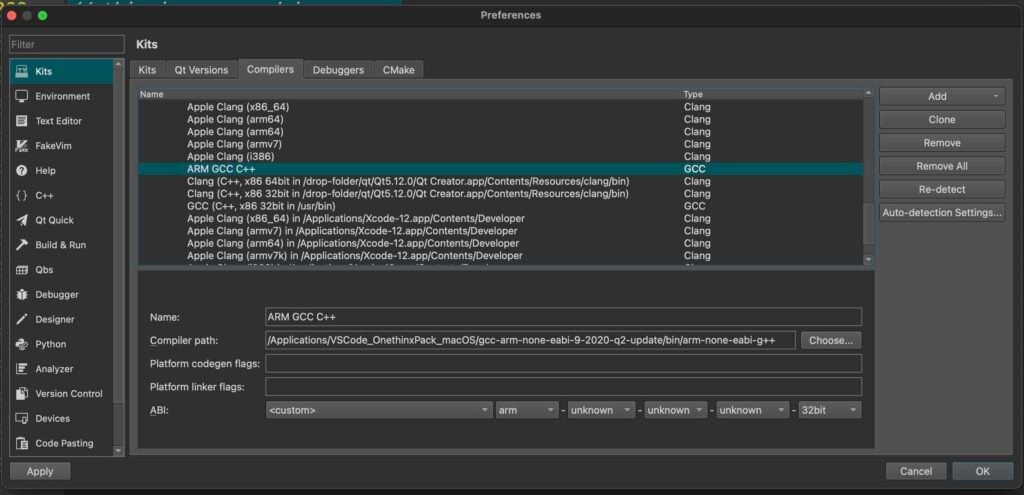
Click OK to close the window.
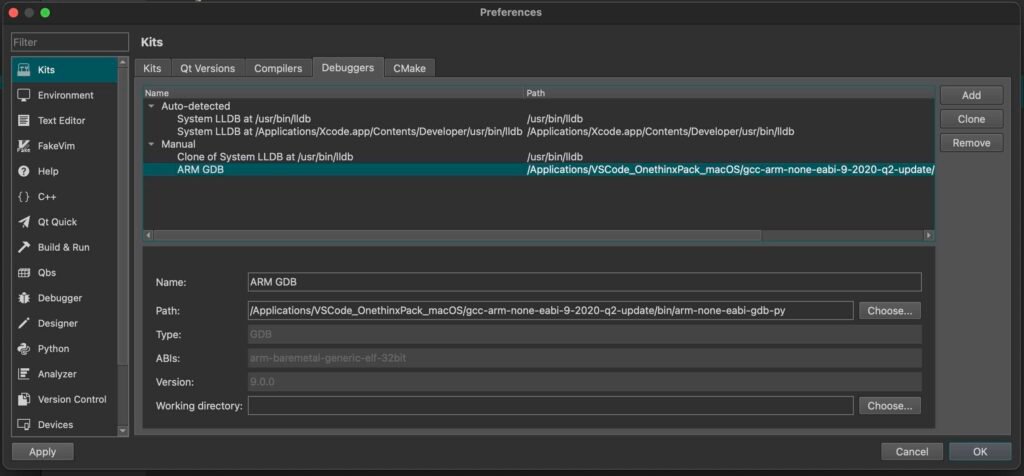
Part 3:
Click on the Debuggers Tab. Click Add button and add the ARM GDB with the path pointing to your gdb installed with OneThinx. You MUST choose the gdb-py version!
Part 4:
Then click on the Kits tab, and click on the “Add’ button.
- Name it ARM PSOC 5.
- Choose “Bare Metal Device” for Device type,
- Choose PSOC5 Bare Metal Device for the Device:
- Choose Arm GCC and ARM GCC C++ for your compilers.
- Choose ARM GDB for the Debugger:
- Qt Version is none.
- CMAKE tool is the System CMake, which in my case is the CMake.app in the Applications folder.
- Generator is Ninja.
- In the CMake Configuration:, click the Change Button, and add 2 strings:
CMAKE_CXX_COMPILER_WORKS:STRING=1
CMAKE_C_COMPILER_WORKS:STRING=1
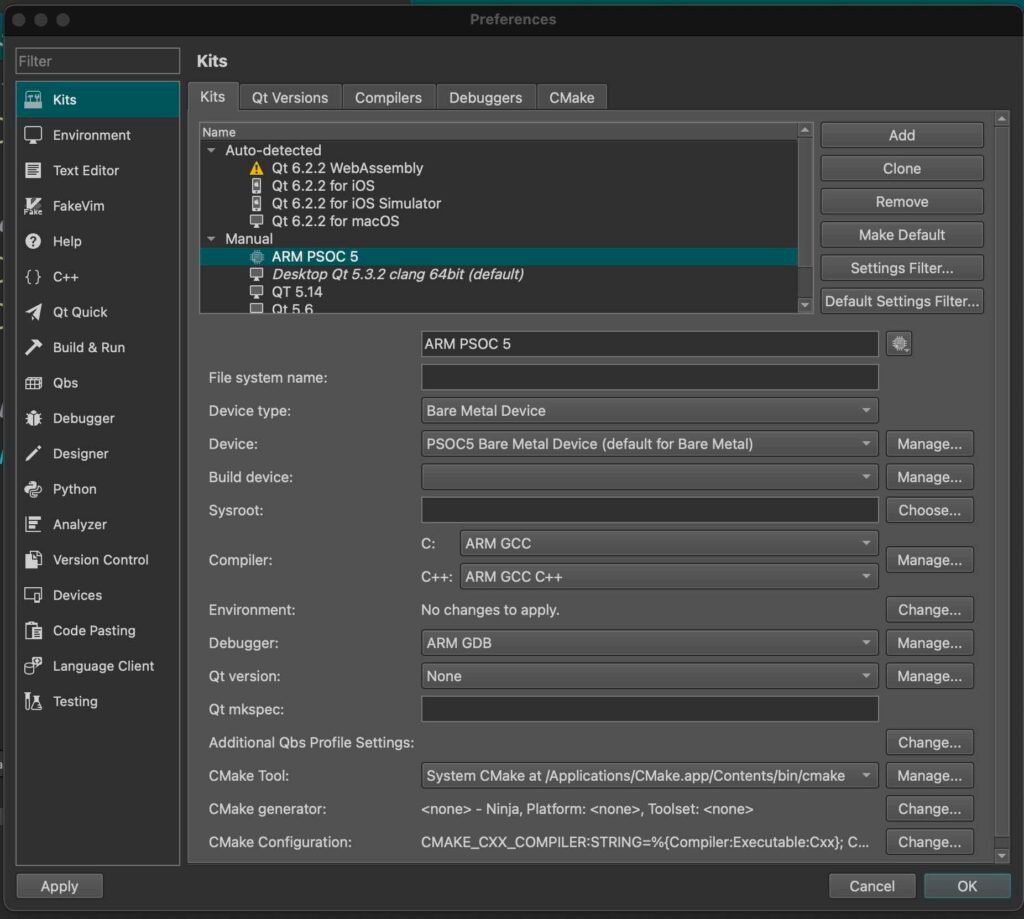
9. Continued: Once you click “Apply” these strings will sort themselves out to be in the right positions:

If needed, select “Save All” Quit QT Creator. Reload. Verify everything stuck. (In my case, one or two settings disappeared, but that may have been my fault.)
Final Step (almost)
Choose Menu File -> Open File Or Project. Navigate to your folder, and choose CMakeLists.txt as the project.
The “Open” button should highlight. Click Open, and the project should load. The Build Menu Changes. If you get an error similar to the following in your “General Messages” section of QT Creator:
CMake was unable to find a build program corresponding to “Ninja”. CMAKE_MAKE_PROGRAM is not set.
Then most likely “ninja” is NOT in your path.
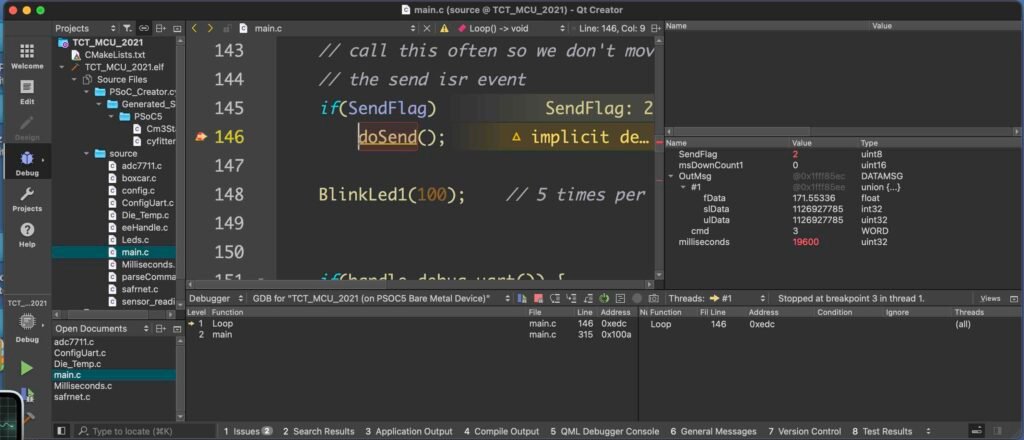
It Works!
At this point, you should be able to click on the hammer to build, on the Debugging arrow to debug (in the lower left hand side of the Creator IDE). You have to put a breakpoint in your main function before you start. Unfortunately, it does not run to “main” at the beginning. I may eventually figure that part out.
Final Thoughts
This is the same CmakeLists.txt that you used with VSCode! It Is *unchanged*. This means you can swap between the environments without issues: VSCode, Qt Creator, PSOC Creator (assuming you followed the instructions in the previous posts).
What I Don’t Like:
(1) You have to set a breakpoint somewhere in main. This debugging environment does not stop at the first section of main. I am sure that can be resolved some time in the future, but It does not yet bother me. If one of you has the solution, let me know.
(2) The source files (.c) are found under the project.elf indicator in the Project panel, but the header files are nowhere to be found. You can use a right-click “Switch header-source” menu on the #include directive to open the header file.
(3) The “Generated Source” folder only has 2 files in it (The generated files from the PSOC Creator build are invisible, for the most part.)
What I like:
(1) I get to use the QT Creator editor and debugger, which I find more intuitive.
What I would Like to See
(1) A way to not use the same GDB parameters if I am debugging a standard QT project. Those startup parameters are only for the ARM processor. Not sure how to do that yet. It may interfere with a normal QT project.
(2) A way to use qmake with this. The .pro files are fairly powerful. I am not conversant enough with CMake to like it yet. CMake is very sensitive and vomits on you at the least little thing, based on my playing with it. It gets its feelings hurt a lot. However, since the same CMakeLists.txt file is being used, you get to switch between systems until you find the one you really like.
(2) Header files in the Projects panel. (Point to VSCode: those are available with VSCode)
(3) All the Generated Source files in the Projects panel. (Point to VSCode: those are available with VSCode)
Enjoy!
Debug snapshot:
About The Author
W Maxfield
Firmware/hardware Engineer for too many years.