PSoC 101 and a PSOC Creator Trick (Updated)
(Touch.bat now explained.) One of the major reasons I like the PSoC family is due to the PSoC Creator. As of this writing, it is at version 4.3. Even though the IDE is several years old, it is still the most intuitive development environment available. This IDE is available from https://www.cypress.com/products/psoc-creator-integrated-design-environment-ide. (You will have to create a user account, but the IDE is free to download.)
The strength of the PSoC family is also one of the drawbacks. Almost every pin can be used for any function. This greatly simplifies circuit board design and layout. If you accidentally use the wrong pin for a function, just re-map it inside PSoC Creator, compile, upload, and go.
I am a visual guy. I can understand what I can watch and see much faster than I can understand through reading text. The folks at Cypress understand that, and have created a series of videos on You Tube. You can search for PSOC 101, or start at this link: https://www.youtube.com/watch?v=wttaZVbmBI8&list=PLIOkqhZiy83F8KPvHejA4ujvAfwJYpAtP (included below)
While this instruction is for the PSoC 4 series, it applies to the PSoC 5 series. Cypress decided to make the PSoC 3, 4, and 5 series parts extremely compatible with each other in terms of what you can do with pins and internal logic. Of course, the higher you go in the part numbering, the more you can do inside the device. So, a PSoC 5 can handle more custom internal logic than a PSoC 4 or 3. Even so, the things you do to the pins inside PSoC Creator are the same, so your learning curve is reduced.
With the PSoC 6 series of parts, Cypress decided to focus on IoT. This “Internet Of Things” requires more security and more CPU processing power. To accommodate this, Cypress added in another ARM processor core, and removed some custom digital and analog resources. Study the PSoC 6 family data sheets for more information. They also have this part available in small BGA style packages, which are difficult for the typical maker to use. Other packages are announced, but not available in small quantities at the current time.
With external devices, the PSoC 5 is not out of the IoT game. There are some available devices for very little money that allow you to do IoT edge devices, although the product footprint will almost always be larger. However, it is extremely affordable for the Maker.
New Working Project
After you have finished with at least the first PSoC video, you should have a handle on using PSOC Creator. In this Trick section, I will show you how to embed a time and date stamp in your code that is updated each time you compile. I usually use the micro USB attached to the end of the PSOC creator board to provide a debug serial port so I can test and work with my code from my computer during development.
For the project we will be working on, create a new project under File -> New -> Project and click on “Target Kit” and choose the Cy8CKIT-059. Click Next, and choose “Empty Schematic” by clicking on the text. (This will set your project with the correct processor and other settings you need to have for a successful compile. ) Click Next, and name the project. I am calling the project ThermController as a working title. I put that name in both “Workspace name” and in “Project name” text boxes, then click Finish.
A note about our project. When the project is finished, we will be controlling a window air conditioner/heat pump/heater unit with a wall mounted (or table sitting) control unit that will keep proper temperatures.
You may ask the question, “why?” Well, the window unit knows the temperature at the window. Rising or falling outdoor temperatures can and do confuse these units, and their temperature control for the rest of the room is not ideal. This project takes care of this issue.
I am licensing this under the GPL V3. You are free to take this project and recreate it, sell it, improve it, etc. However, you have to provide the code for this unit upon request to anyone you transfer it to. You have to inform them of that right. The GPL V3 license is here: https://www.gnu.org/licenses/gpl-3.0.en.html.
If you wish to use this in a commercial project without revealing code, a commercial license is available. With a commercial license, you do not have to publish any information concerning the code or design.
PSoC Creator Trick — Time and Date
For any project, one good thing to know, is “What version of code is in that PSoC?” With the following trick, you will always be able to find out, even if you have to open the binary file with a hex editor. Let’s get started.
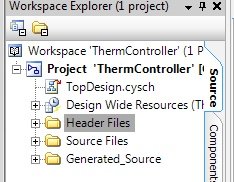
Right-click on the “Header Files” section, here:
then you will get a menu. Select “add->new Item” and click on “Header File.” Then click on the text box next to Name. Call it “Version.h” and click ok. You will get a skeleton, similar to below. Add a “VERSION_STRING” line in the file. Don’t forget to include the #ifndef and #endif lines. For the project I will be unfolding over the next few weeks, the product is an window air conditioner control unit.
#ifndef VER_H_
#define VER_H_
/* ========================================
 *
 * Copyright Wade Maxfield, 2020
 * All Rights Reserved
 * LICENSED SOFTWARE.
 * Licensed under GPL V3.  Commercial
 * license is available.
 *
 * ========================================
*/


#define VERSION_STRING "AC Control Thermometer V1.0.  Build: "__DATE__ ", " __TIME__ "\n\r"

#endif
/* [] END OF FILE */
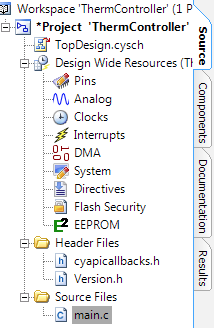
Save the file. If you look at your Header Files folder in the left hand side, you will see it is now included in the project. You don’t have to do anything else. Now, any time the file that includes “Version.h” is compiled, the VERSION_STRING will carry the time and date embedded within it. Our next step is to add the header into a file.
Click on “Source Files” in the workspace. Double click on main.c to open it. Add the line #include “Version.h” as shown in the main.c, under the “project.h” line.
/* ========================================
 *
 * Copyright Wade Maxfield, 2020
 * All Rights Reserved
 * LICENSED SOFTWARE.
 * Licensed under GPL V3.  Commercial
 * license is available.
 *
 * ========================================
*/
#include "project.h"
#include "Version.h"

int main(void)
{
    CyGlobalIntEnable; /* Enable global interrupts. */

    /* Place your initialization/startup code here
       (e.g. MyInst_Start()) */

    for(;;)
    {
        /* Place your application code here. */
    }
}
Create touch.bat
Now, open up a text editor (I use notepad) and create a one line file and save it as touch.bat in the same directory as main.c. (Usually ThermController\ThermController.cydsn\ directory). The contents of the file is as follows:
@copy /b %1+,,Modify build settings
You are almost there! Only one more thing to do. Click on the Project menu -> Build Settings… and then expand the “ARM GCC…” section, expand User Commands, and add in “Pre Build” the line touch.bat Version.h. (see below) Click Apply, and you are done.

From this point forward, when you do a build on your project, the Copy command will “touch” the file Version.h, causing its time and date to update, but the contents of the file stay the same. The PSoC Creator Make system will compile main.c (because it includes this file) each and every time. The __DATE__ and __TIME__ macros are replaced with a date and time.
At some point in the future, I will show you how to us the USB to create a UART that you can create a text based command processor with. That command processor will use the VERSION_STRING so you will always know when you compiled the project loaded into your PSoC. I will also show you how to connect to the USBUART on a Mac or Linux machine.
Enjoy!
About The Author
W Maxfield
Firmware/hardware Engineer for too many years.
Hello W Maxfield
Thanks a lot for your post. I have never been very good with preprocessor stuff because of my lack of formal training.
I used part of your code in my application. But I dont understand all the last part about changing the build settings. I think you forgot to say what we should write into the “touch.bat” file. Anyway, my code works fine without all that /Pre-Build section is empty and I dont have any touch.bat file at all.
Thanks again!
I apologize! I left out the line of code for touch.bat. The post is now updated to reflect that.
What you do is create a touch.bat file that simply updates the timestamp of the file. The contents of the file is only one line, “@copy /b %1+,,”
Thank you for letting me know.
Yes, your code will compile without adding in the touch.bat. What this feature does is provide a time change on one file so you can always have the date and time of the last time you built the project.
thanks!