Intermission #2: PSOC Creator and PSOC 6 — FAILURE!
In the previous post, I covered how to use the Modus Toolbox to discover what was included in the example project for the PSOC 6. Since Infineon appears to have made the decision to only support new development boards in Modus Toolbox, and move away from the Visual Development paradigm, we have to roll our own projects. Fortunately, for now, that is easy to do.
PSOC Creator New Project for PSOC 6
The first thing to do is to download the files on the Infineon web page for the Cypress development board. Once that is done, open the schematic, and look for the PSOC part number. For the 62s3 board we have, it is CY8C6245LQI-S3D72. This part number identifies the CPU exactly.
Go to PSOC Creator, and open a new project. Click on Target Device and select the PSOC 62 as a target:
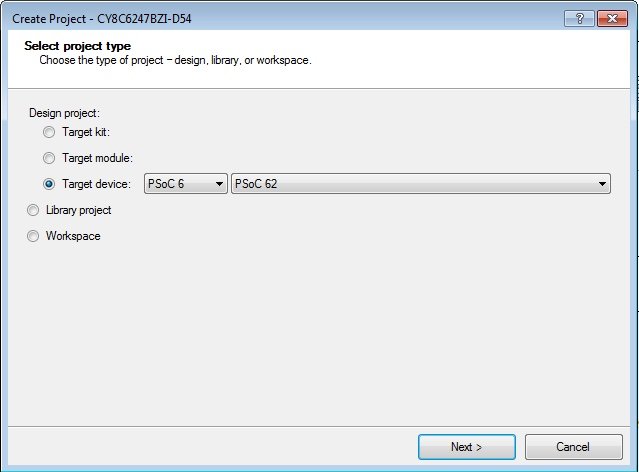
Click Next. At this point, you can diverge. If you *do not* want to use the schematic GUI, use the PDL (Peripheral Driver Library) then you can select “Code Example.” As I stated in a previous post, the PDL provides you to skip a schematic altogether.
With the PDL, your code is very portable, as no schematic symbols have to be moved from your code to a new project. The downside is, if you use a schematic, you may not realize you just shot yourself in the foot because a library function is claiming your component for itself.
Another good use of PDL style libraries is to allow future AI technology to create projects on its own. This will become the future, as new engineers are pushed to put designs out faster without having to understand the underlying technologies. It also makes it easier for the open source community to develop projects in their own IDE’s.
However, I think visually. So, for me, the Creator paradigm suites me best.
A Commentary Aside
Don’t misunderstand me, like the Tom Selleck character Quigley, explaining he had no use for a handheld short distance protection device in Quigley Down Under, even though I don’t like only using things like PDL, Verilog, or VHDL, I have made a living writing that style of code for around 40 years.
(I literally hate the Xilinx SDK, SDSoC™ and SDAccel™ development environments of yesteryear. I spent 90% of my time wrestling the development environment and 10% of my time writing VHDL or CPU code. Same goes for its embedded processor development and debug technology.)
Part of my disdain for Eclipse comes from the experiences I had with it and Xilinx in general. I had to work around many bugs in Eclipse implementations, and Xilinx code. Based on feedback from Xilinx personnel at that time, I felt they were proud of how hard it was to use their product.
At some point in the future, I hope to cover doing a Verilog component in PSOC Creator. That assumes I live long enough!
Back To The Job At Hand
I chose “Empty Schematic” to create the project I want. For now, ignore the fact the processor is not correct. Our PSOC Creator 4.4 should allow us to override this processor selection soon:
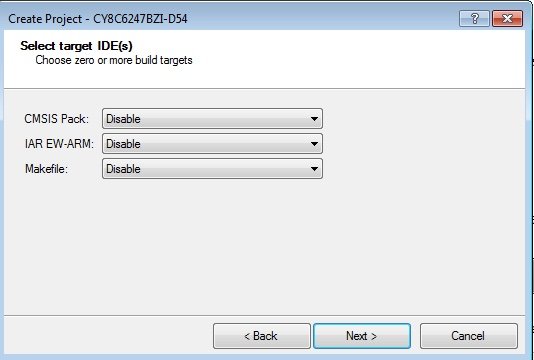
The next screen allows you to create items that allow export for other IDE’s and editors. I chose “Disable” on all the selections.
The CMSIS Pack for the PSOCS is available from https://github.com/cypresssemiconductorco/cmsis-packs. (This is another version of a PDL, from ARM itself. You can read about CMSIS at https://developer.arm.com/tools-and-software/embedded/cmsis. Since the CMSIS is an ARM supported library, it will be consistent across development platforms. If you want your code to be portable, with minimal changes, to other SOC’s, use the CMSIS whenever possible.)
The IAR EW-ARM selection puts out code that can be imported into IAR’s development environment. I have used IAR in the past. It is difficult to get to work with debugger hardware, but once it everything is configured properly, it is very stable. I ported my AVBasic Interpreter for Android (Android Visual Basic), minus the Android and Visual part of it, to a TI ARM CPU using that IDE.
The Makefile selection allows you to use this on command line platforms like Macintosh, Linux, or even Windows. I chose none of the above:
Finally, I named the project HelloWorld and set it into a workspace on my C:\ Drive inside my virtual Machine. The “cti” user is more or less a nonsense username:

Once that is done, a project is created, with a minimal run system. Unfortunately, the project only creates more or less empty “main.c” files. So, I went back and created a PSOC 6 “hello world” example which uses the Pioneer kit board. The “main” functions in that project gave me the final clues. There is a line missing in the empty project created for you when choosing an empty project. Here is a “true” empty skeleton:
int main(void)
{
    __enable_irq(); /* Enable global interrupts. */

    /* Enable CM4.  CY_CORTEX_M4_APPL_ADDR must be updated
       if CM4 memory layout is changed. */
    Cy_SysEnableCM4(CY_CORTEX_M4_APPL_ADDR);

    for(;;)
    {

    }
}
The PSOC 6 is a dual-core device. I has 2 ARM processors in it. The first processor is an M0, low powered, variant. The second is an M4 variant, more power, more speed.
PSOC 6 Startup
The M0 processor starts up first, and the M4 processor is disabled. The M0 processor can check the M4 processor code to make sure it has not been tampered with. Once the M0 processor is running, it must explicitly enable the M4 processor. The “empty schematic” version of that project does not do that for you.
Once I put in the instruction to startup the high powered processor, I changed the processor selected. Go to menu Project->Device Selector, and select the processor used on that screen.
SURPRISE!! PSOC 62, 245 PART IS NOT SUPPORTED ON PSOC CREATOR!
I will report this to Cypress/Infineon. Maybe they will change their mind and support this product on PSOC Creator in the future…..
If they do, I will pick this thread up and finish it….
Enjoy!
Next time I will resume the 3D printer project heater code, if I am able.
PSOC 62 Processor Details
The M0 processor has the following characteristics:
- Member of the ARMv6-M family
- 3-stage instruction pipeline
- Instruction sets:
- Thumb-1 instructions: missing CBZ, CBNZ, IT
- Thumb-2 instructions: BL, DMB, DSB, ISB, MRS, MSR
- 32-bit integer multiply with 32-bit result
- 32 interrupts, and NMI
The M4 processor has the following characteristics:
- Member of the ARMv7E-M family
- 3-stage instruction pipeline with branch speculation.
- Instruction sets:
- Thumb-1 (Thumb mode take less memory space to store code in)
- Thumb-2
- 32-bit integer multiply with 32/64-bit result, signed or unsigned
- Add or subtract after a multiply.
- 32-bit Multiply, Multiply Accumulate (MAC) are 1 cycle each.
- 32-bit integer divide, requiring 2 to 12 cycles.
- Fixed ranges on arithmetic, (supporting minimum and maximum values for the results)
- DSP features: 1 cycle 16/32-bit MAC, 1 cycle dual 16-bit MAC, 8/16-bit Single Instruction Multiple Data (SIMD) arithmetic.
- 240 Interrupts, plus NMI
- 12 cycles interrupt latency.
- Sleep modes.
About The Author
W Maxfield
Firmware/hardware Engineer for too many years.
PSoC Creator uses files with the extension .cydata. These are simply GZIP files with a modified header. Open the files in a hex editor and delete PSOCCREATORDATAFILE. Change the first 7 bytes from 5CF27872E5031C to 1F8B080080706F. Then save the file with extension .gz.