PSoC USB UART: A Debugging Tool (Updated 2024)
When working on a project, it is often useful to have the ability to peek into the world of the processor. In those cases, I like to combine the ability to power my project with 5 Volts with a communication path into my code.
This can easily be accomplished through the PSoC 5’s USB port. Fortunately, Cypress has done 99% of the work for you within PSoC Creator 4.2, when using the USB component. (For completeness, regarding using a debug serial port, see note 1 at the bottom of the post.)
Implementation Details: Your USB Project
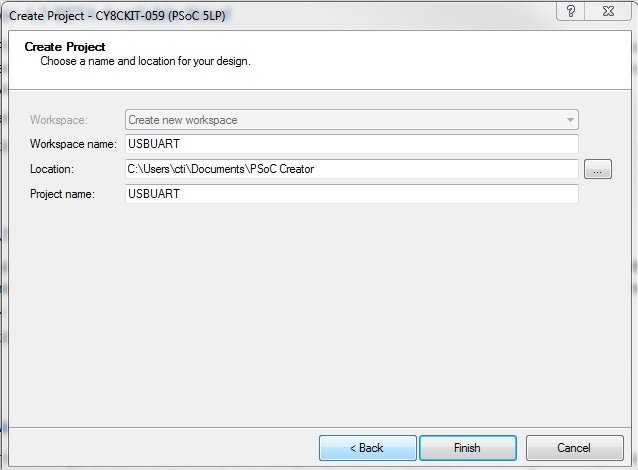
First, create a new project. (Menu File->New) Pick the CY8CKIT-059 as the target. Click Next. Click on Empty Schematic. Name the Project. For this example, it is USBUART, and in the default location. You are free to put the project anywhere you choose. Click Finish.

At this point, your schematic should be showing. If not, double-click on the “TopDesign.cysch” in the Workspace Explorer on the left. Go to the tab at the bottom that says Page 1, and right-click on it. Go down to rename page and change its name to USB Uart.

On the right is the Cypress Component Catalog. Click on the search section and type in “usb”. The following should be shown:

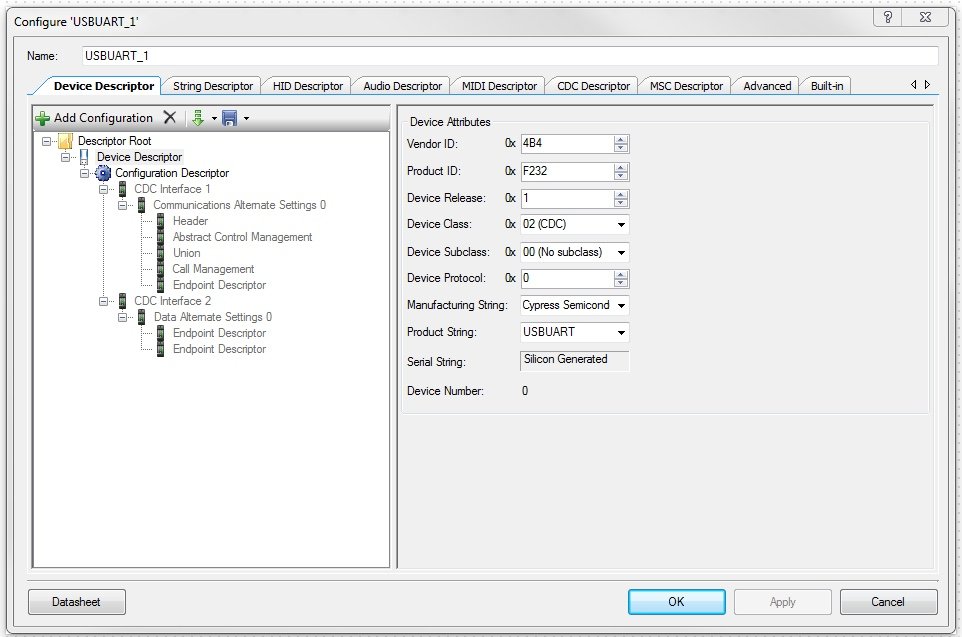
Click on USBUART (CDC Interface) and drag it to the middle of your schematic page. Right click on the USBUART_1 and select “Configure” from the menu:

You should see the following. If you do, everything is good:
Go to the Build Menu and choose Build:

This sets up the variables and API so you can enter code and get suggestions as you work. If you don’t do this step, then you will get errors in the smart editor as you work. This is OK if you have experience, but at this point, we are walking slowly.
You will get a “USB Clock” error at the bottom of the IDE, in the “Notice List” area:

You can search for these errors and solve them by getting information from your favorite search engine. Or, you can double click on the “Clocks” section of the Workspace Explorer on the left (under Design Wide Resources) and fix the problem.
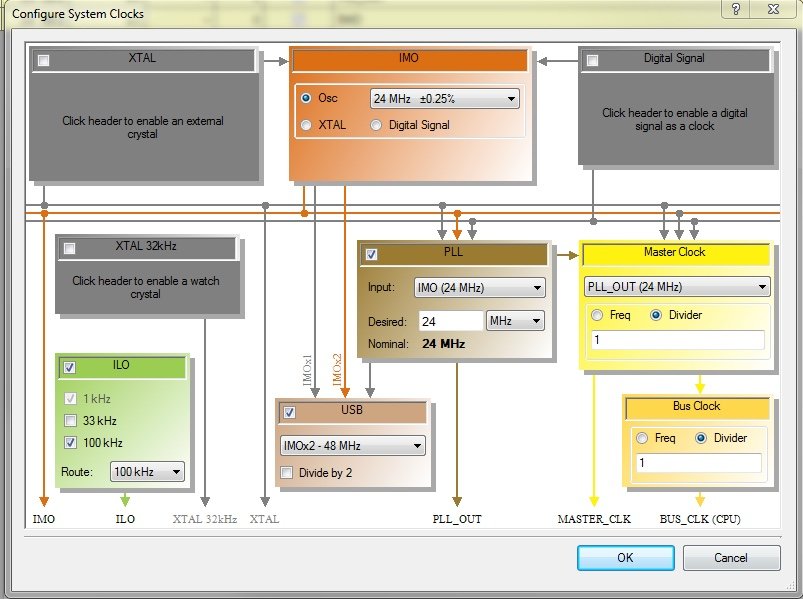
Once you click the Clocks icon, you will see the following:

The problem is the System clock has not been set up properly for USB, and the ILO (Internal Low Speed Oscillator) is not configured properly to use USB. Double click on the USB_CLK row, and you should see the following:

There are three things wrong on this dialog. Only two of them are obvious. The un-obvious first: You must set the IMO (Internal Main Oscillator) to be 24 MHz. That speed has an error of 0.25% (It is trimmed on the PSOC production line). Then you must click on the checkbox in the grey USB selection. In the ILO section, click on the 100 kHz checkbox, and then on the “Route” dropdown, choose 100 kHz. Those choices will make the errors go away. Your dialog will look like this:
Click OK. Rebuild the project.
Now For Some Code
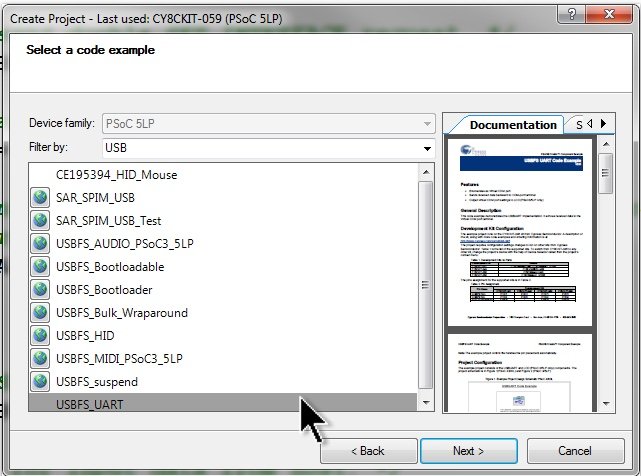
At this point, I was stuck. I was not sure what to do next. Fortunately, Cypress provides example projects. Without closing PSoC Creator, I went to the System Start Menu and chose PSoC Creator again. A new window came up. I did a File->New, CY8CKit-059, and then loaded an example project for the USBFS_UART using the “Code Example” section. In the dialog box that showed up, I entered USB in the search, and loaded the last item in the list:
I then looked at that project’s main.c file and copied much of the code into my project. I like having a file for each component’s functionality, so I right clicked on the Project Explorer “Header Files” section and selected “Add-> New Items” and clicked “Header file” in the list and named it USBSerial.h.
To make things easier, every header file needs a “fence” around it. This is an #ifndef _FILENAME_H_, #define _FILENAME_H_, where you place the header file name. At the end, there is an #endif. This way, you can include the file in multiple places, without having problems with undefined or doubly defined symbols.
One More Thing: Notice the /* [] END OF FILE */ line? That line is there because the C Compiler needs a line with no code in it at the end of the file during its work. Don’t remove this line or you will have strange errors.
Add the USBSerial.c file and by right clicking on the “Source Files” section. Fill in the header as you wish. Here is my USBSerial.h file.
Header file:
#ifndef USBSERIAL_H_
#define USBSERIAL_H_
/* ========================================
 * Copyright Wade Maxfield, 2020
 * All Rights Reserved
 * LICENSED SOFTWARE.
 *  Under the GPL v3 license
 * This license does not override previous licenses
 * Some information may be Proprietary to
 * Cypress (http://www.cypress.com) for their
 * PSoC 5LP®--Cypress Semiconductor and
 * only usable on their devices.
 * PROPERTY OF Wade Maxfield.
 * Commercial license available
 * ========================================
*/

#ifndef ___int8_t_defined
    #include "project.h"// needed for uint8_t,uint32_t
#endif


typedef struct USBSerialMessageStruct
 {
    uint16_t ucMessageID;
    uint16_t size;
    uint8_t  msg[ 129 +1];// allow terminating zero just in case
 } USBSerialMessage;

#define NUMBER_OF_USB_BUFFERS 3
extern USBSerialMessage USBRxBuffer[NUMBER_OF_USB_BUFFERS+1];

void initUSBSerial( );
int16 usbserial_putString(const char msg[]);
int16 handleUSBSerial();// return -1 for no data, 0 to NUMBER_OF_USB_BUFFERS for data
int16 usbserial_putChar(char c);

#define printMessage usbserial_putString
#define printChar    usbserial_putChar
#endif
/* [] END OF FILE */
When I use a file for a component, I like to create an init function, a “handle” function, and various helper routines. These functions allow me to formalize statements in the main() function, and usually allow me to add or remove components and modules easily. I also like having the full source code available to me, because every project is *almost* the same, but never identical.
Here is my USBSerial.c file. Look it over carefully, and compare it to the example from Cypress. During my testing, I found that the example code needed a few tweaks to make it usable.
Look carefully in the usbserial_putString() function to see the code necessary to make using the USB work with plug and unplug events while your code is still printing messages, etc. The putChar() function is a wrapper around the putString() function, mainly because I am lazy. The code you see here makes the USB interaction much more robust, so ignore this code at your own expense. The ideas for this code were assembled from the Cypress Community Forums.
/* ========================================
 *
 * Copyright Wade Maxfield, 2020
 * All Rights Reserved
 * LICENSED SOFTWARE.
 *  Under the GPL v3 license
 * This license does not override previous licenses
 * Some information may be Proprietary to
 * Cypress (http://www.cypress.com) for their
 * PSoC 5LP®--Cypress Semiconductor and
 * only usable on their devices.
 * PROPERTY OF Wade Maxfield.
 * Commercial license available
 *
 * ========================================
*/
#include "project.h"
#include <stdlib.h>
#include "USBSerial.h"

#define USBFS_DEVICE (0)  // not sure why needed

USBSerialMessage USBRxBuffer[NUMBER_OF_USB_BUFFERS+1];
int16_t currentBuffer;

/*-----------------------------------------------------------*/
/*-----------------------------------------------------------*/
int16 usbserial_putString(const char msg[])
{
   int16 loopCount=0;

    if(0 == USBUART_1_GetConfiguration())
        return -1;
    if (0==USBUART_1_CheckActivity())
        return -1;

/* IF plugged into a Mac, AND
   no attempt to made to communicate to serial port
   THEN
   CDCIsReady() never comes true
   a 25ms wait does not affect overall performance
  Note: this only happens when debug printing to USB
  is automatically turned on
*/
    loopCount=0;
    while(0 == USBUART_1_CDCIsReady()){
       CyDelay(1); // wait 1 millisecond
       if (++loopCount>24)// bail after 25ms
          return -1;
    }
    loopCount=0;
    while(0 == USBUART_1_CDCIsReady()){
       CyDelay(1); // wait 1 millisecond
       if (++loopCount>24)// bail after 25ms
          return -1;
    }

    if (USBUART_1_CDCIsReady())
        USBUART_1_PutString(msg);

    CyDelay(1);// let UART code clear
    return 1;
}
/*-----------------------------------------------------------*/
// fake out putstring
/*-----------------------------------------------------------*/
int16 usbserial_putChar(char c) {
    static char cToPrint[2];

    cToPrint[0]=c;
    cToPrint[1]=0;
    return usbserial_putString(cToPrint);
}

uint16_t rxCount;
uint16_t bufferNumber=0;
/*-----------------------------------------------------------*/
/*-----------------------------------------------------------*/
void initUSBSerial( )
{
    /* Start the USB_UART */
    /* Start USBFS operation with 5-V operation. */
    USBUART_1_Start(USBFS_DEVICE, USBUART_1_5V_OPERATION);
}
/*-----------------------------------------------------------*/
/*-----------------------------------------------------------*/
int16 handleUSBSerial() {
    int16 bufNum;

        /* Host can send double SET_INTERFACE request. */
        if (0u != USBUART_1_IsConfigurationChanged())
        {
            /* Initialize IN endpoints when device is configured. */
            if (0u != USBUART_1_GetConfiguration())
            {
                /* Enumeration is done, enable OUT endpoint to
                 * receive data from host. */
                USBUART_1_CDC_Init();
            }
        }

        if(0 != USBUART_1_GetConfiguration())
        {
            /* Check for input data from host. */
            if (0u != USBUART_1_DataIsReady()){
                USBSerialMessage *ptr = &USBRxBuffer[bufferNumber];
                /* Read received data and re-enable OUT endpoint. */
                rxCount = USBUART_1_GetAll(ptr->msg);
                // now post these bytes to the Debug Terminal Task
                ptr->ucMessageID = bufNum=bufferNumber;
                ptr->size=rxCount;
                ptr->msg[rxCount]=0;// terminate string just in case

                // send received message to debug terminal task.
                // Future: we can route messages anywhere depending upon
                // message contents.
                bufferNumber++;
                if (bufferNumber >= NUMBER_OF_USB_BUFFERS)
                    bufferNumber=0; // reset the ring

                return bufNum;
            }

        }

    return -1;
}

// end of file
I also added a parseCommands.h and parseCommands.c in preparation for making a debug console to communicate with my project. This will be useful in the future when we start playing with temperature and a Nextion display.
parseCommands.h:
#ifndef _PARSE_H_
#define _PARSE_H_

#include <project.h>

extern void parse(char *RXBuffer, uint16 *rxCount);
extern void init_parse();

extern int16 debugPrint;// turn on/off debug statements

#endif
parseCommands.c:
/* ========================================
 *
 * Copyright Wade Maxfield, 2020
 * All Rights Reserved
 * LICENSED SOFTWARE.
 *  Under the GPL v3 license
 * This license does not override previous licenses
 * Some information may be Proprietary to
 * Cypress (http://www.cypress.com) for their
 * PSoC 5LP®--Cypress Semiconductor and
 * only usable on their devices.
 * PROPERTY OF Wade Maxfield.
 * Commercial license available
 *
 * ========================================
*/
#include "parseCommands.h"
#include <stdio.h>
#include "USBSerial.h"

char outMsg[64];
char commandBuffer[64];
int16 commandBufferIndex;

int16 debugPrint;

//-------------------------------------------
//-------------------------------------------
void init_parse() {
    uint16 c=1;
    parse("v",&c);// show sign on message
}

//-------------------------------------------
//-------------------------------------------
void parse(char *RXBuffer, uint16 *rxCountp) {
    int16 rxCount = *rxCountp;
    static int16 bufferIndex;
    *rxCountp=0;// reset indicating we consumed buffer
    char c;
   // int index,index1;
   // int32 result;


    for (bufferIndex =0 ; bufferIndex < rxCount; bufferIndex++) {
        c=commandBuffer[commandBufferIndex++]=RXBuffer[bufferIndex];
        printChar(c);
        if (c != '\r')
            continue;

        printChar('\n');
        commandBufferIndex=0;
        // we have received data from usb.  look at it and determine what to do
        switch(commandBuffer[0]) {
            case 0:
            case '\n':
            case '\r':
            default:
            case 'v':
            case 'V':
            printSignon:
                printMessage("\n\n\r--------\n\r");
                printMessage("commands: (press enter after command to execute)\n\r---------\n\r");
                printMessage(" D      -- Toggle Debug Print\n\r");
                printMessage(" V      -- Version / help\n\r");
                printMessage("--\n\renter command>");

                return;


            case 'd': case 'D':
                debugPrint=!debugPrint;
                printMessage("Debug print now ");
                if (debugPrint)
                    printMessage("on\n\r");
                else
                    printMessage("off\n\r");

                    goto printSignon;
            break;
            }//switch(commandBuffer
    }//for()
    return;

}

/* [] END OF FILE */
Now that we have a component skeleton fleshed out, let’s add it into the main() function. Here is the main.c file:
/* ========================================
 *
 * Copyright Wade Maxfield, 2020
 * All Rights Reserved
 * LICENSED SOFTWARE.
 *  Under the GPL v3 license
 * This license does not override previous licenses
 * Some information may be Proprietary to
 * Cypress (http://www.cypress.com) for their
 * PSoC 5LP®--Cypress Semiconductor and
 * only usable on their devices.
 * PROPERTY OF Wade Maxfield.
 * Commercial license available
 * ========================================
*/
#include "project.h"
#include "USBSerial.h"
#include "parseCommands.h"

int main(void)
{
    // the following two variables are for USBSerial/Command Parser
    int16 bufNum;
    USBSerialMessage *USBRxPtr;

    CyGlobalIntEnable; /* Enable global interrupts. */

    /* Place your initialization/startup code here (e.g. MyInst_Start()) */
    initUSBSerial();// setup the USB serial interface.
    init_parse();

    for(;;)
    {

        //======================
        // usb serial port
        //======================
        if ((bufNum=handleUSBSerial())>=0){
            USBRxPtr=&USBRxBuffer[bufNum];
           parse((char*)(USBRxPtr->msg),&(USBRxPtr->size)); // handle possible command
        }

    }
}

/* [] END OF FILE */
One thing to note here. I accidentally added my file into the Workspace Explorer as parseCommands.C, and the file compiled. (The end of the file name has a capital C, not a lower case c.) The project had a linking error. After much puzzling, I realized that and renamed the file parseCommands.c. Suddenly everything compiled and linked. Some parts of the build system are case sensitive!
Almost There!
The easiest way is to use Macintosh or Linux talk to your PSOC (no driver installs needed). (Note: **PSoC Creator 4.3 users read Note 2 below.**) If you must use Windows, keep reading….
If you are using windows 10, the following applies:
Update Late 2024: The latest versions of Windows 10 and Windows 11 automatically recognize the USB UART built in Creator using the default configuration for the PSOC5, without device driver installation. Just plug and use.
You need to look at the following link and follow the path(s) and instructions, for Microsoft drivers (for early versions of Windows 10). (As of Sept. 2024, infineon has links forwarding cypress correctly.) I do not use Windows 10 for the reasons specified in previous posts. I now using Virtualbox and windows 11, with unattended install. It produces a decent running environment.
With Windows 10 and Windows 11, you can allow unsigned applications and drivers. This is required to allow development of applications and drivers on a windows platform. It is easier than it was, Microsoft (and Apple) shot themselves in their feet several times before settling on how to make it work.
If the following link works for you, use it. If you have better instructions, please place a comment for this blog. The following information at the link should work. If not, communicate with Cypress Community or tech support regarding USB drivers: https://community.cypress.com/message/57726#57726
If you are running Windows 7, follow the following steps:
After programming the PSoC, plug in the USBUART using a USB cable. You can interrupt the install, but that takes as long as waiting for the installer to give up talking to Windows Update Server. Select the local file location option, and browse to the driver file in the PSOC directory in your project. It will be at: USBUART.cysdn\Generated_Source\PSOC5, assuming your project is named “USBUART.” Install that unsigned driver (under windows 7). You may have to Google allowing unsigned drivers for Windows 7. It should be functional after that. If not, try rebooting your VM or Windows machine.
Macintosh, or Linux:
Under Macintosh or Linux, nothing needs to be done regarding drivers. You can find the USBUART by using the VMWare “USB and Bluetooth…” dialog and disconnecting the USBUART from your Windows VM and connecting it to the Macintosh. You can connect to the port for serial communications using the command line screen utility. Screen should be available on your Mac from the terminal already. If not, check into “fink” or “homebrew” or “macports” and install it using one of those systems. To read about screen, open a terminal window and enter the command “man screen.”
Linux:
Alternatively, connect the USBUART to a Linux VM and use a Linux terminal. It has shown up for me as /dev/ttyACM0.
In Ubuntu flavor Linux, create the following file as root: /etc/udev/rules.d/50-local.rules
using “sudo nano” (or your favorite text editor) to write the file, with the following lines:
KERNEL=="ttyACM[0-9]",MODE="0666"
KERNEL=="ttyUSB[0-9]",MODE="0666"
This will make the plugin of the ACMx world usable without running as root. Easiest way to apply this change is rebooting the Linux machine for this to work. There is a way to do this without reboot, but requires some searching.
You will have to install the “screen” utility, and work with user permissions for the serial port, but the above local.rules should make it usable without root access. Screen has a manual page at “man screen,” once it is installed. If you continue to have permissions problems on Linux, run screen with the sudo command in front of it: sudo screen.
Mac:
Using the Mac Terminal app, discover the PSoC 5 USBUART. You can identify the device by running a terminal window (on the Mac, in Applications/Utilities) and listing devices in the /dev directory. It works substantially the same on Linux, but will be listed as a different device, and may need root permission to use. “ls /dev/tty.*” is the key. It will also show up as a /dev/cu.* on the Mac:
iMac:/ user$ ls /dev/tty.*
/dev/tty.Bluetooth-Incoming-Port	/dev/tty.usbmodemFD1421

iMac:/ user$ screen /dev/tty.usbmodemFD1421 115200
.....
========
after screen comes up, press the enter key. You should see:
=======

--------
commands: (press enter after command to execute)
---------
 D      -- Toggle Debug Print
 V      -- Version / help
--
enter command>
To exit screen, use the sequence: ctrl-a , ctrl-\, and answer ‘y’.
On Windows, run TeraTerm. (Google it for the free download. Putty also works well.) There will be at least two serial ports in the higher ranges listed if you have the KitProg plugged in. The *second* serial port (in my case, I had com22 and com23 listed) is usually the one to connect to: Use 115,200 No Parity, 8 bit data 1 Stop Bit.
Pressing enter in the terminal will get you the printout listed above. Note that if you restart your debug session in PSOC Creator, the USB UART will have to be physically unplugged and replugged. This signals the host OS that the device went away and the USB communication paths (called endpoints) must be re-initialized.
Next time, the process of reading the temperature will be hinted.
Enjoy!
Note 1: If your debugger stub stays attached to the CY8CKit-059, then you can install an internal UART in your project, and connect to pins 12-6 and 12-7 and communicate through the KitProg USBUART, but NOT while debugging.
Note 2: PSoC Creator 4.3 introduces a bug which is rather unpleasant. If you are running VMWare Fusion, and OSX 10.12 (not tested on other OSX versions), and your USB cable is plugged into the PSoC 5, then when you start the debugging process, there is a chance that *every single USB device* will be disconnected from your Macintosh without notice. If you have USB disk drives attached, you will get numerous warnings of unexpected disconnect. This does not happen for PSoC Creator 4.2 or 4.4, it is a new feature.
A workaround: if you wait until the PSOC5 is running before plugging in the USB port, this disconnect does not occur. See this link for more information: https://community.cypress.com/message/233847#233847
Fini (2024)
Like marriage, learning more about the PSOC 5 will eventually bring heartburn. Compared to other devices, it is still worth using. Infineon has gone the “me too” route and abandoned what makes the PSOC5 great. PSOC5 is with another marriage partner.
They are chasing the other chipmakers to get the volume, copying their design ideas. Unfortunately, that is biting them now. The new chips have lower margins (with cheaper to make dies) and fewer capabilities. Fewer UDB’s.
Also, the creation of a truly horrible IDE. (Historically, the underlying IDE nearly died when its maintainers went an ugly direction. Large corporations took over and undid only some of the mistakes of that IDE rebellion. The abandonment of good GUI guidelines and most future GUI canvas abilities was the end result.)
The abandonment of the GUI for on-chip logic/analog design is squarely on Infineon. The abandonment of on chip logic and analog components altogether for newer processors is on Infineon. I suspect the psoc5 has undergone a die shrink, which has changed many of its characteristics, even at room temperature.
In one specific case, using parts at 300F, we have found the EEPROM subsystem storage and modification part dies, even if only used for reading. This means the part should never be used on automobiles.
THIS DID NOT OCCUR BEFORE iNFiNEON BOUGHT CYPRESS. We have had to move to different permanent memory subsystem, off chip.
Oh, well. c’est la vie.
Enjoy!
About The Author
W Maxfield
Firmware/hardware Engineer for too many years.
Hi Wade.
I’ve just looked at your code, built a project using the examples, compiled with no errors.
I’m using a PSoC LP5 kit to test.
Unfortunately, I’ve come across and issue I am unable to resolve, the
printMessage();
routine does not work. I get nothing appearing in the terminal. Individual characters are echoed back, but no string message is printed.
Any pointers?
In USBSerial.h, printMessage is defined as usbserial_putstring. In my projects, the RS232 uart is sometimes used for debugging, and the USB uart is sometimes used. I do this to avoid having to do search and replace as function names change.
You should be able to put a breakpoint in the usbserial_putstring() function, and when the printMessage() is called, you should be able to trace the working of the function, using the debugger in PSOC Creator.
If you are using CY8CKit-059, under Windows, be sure to follow the notes about installing drivers. If you are using a terminal program under windows, then you may be seeing characters coming back due to local echo, and you may be connecting to the UART on the debugger stub. (You may see 2 serial boards in the higher ranges, and be connecting to the wrong one.)
CommentI am having all code with me (https://drive.google.com/drive/folders/1hKyy2O2HLyh9o4wxKsPFoyXOMyaorkv7)
https://www.duo.uio.no/bitstream/handle/10852/82665/5/Olav-Bjerke—masteroppgave.pdf .
Getting USB Time out error while replicating this into CY8CKIT-059